
Toyota RAV4 (XA40) 2013-2018 Service Manual: Shift solenoid "d" control circuit

Description
Shifting from 1st to o/d is performed in combination with the on and off operation of the shift solenoid valves sl1 and sl2, which are controlled by the ecm. If an open or short circuit occurs in any of the shift solenoid valves, the ecm controls the remaining normal shift solenoid valves to allow the vehicle to be operated safely (see page ax-31).

Monitor description
This dtc indicates an open or short in the shift solenoid valve s4 circuit. The ecm commands gear shifts by turning the shift solenoid valves on/off. When there is an open or short circuit in any shift solenoid valve circuit, the ecm detects the problem, illuminates the mil and stores the dtc. Also, the ecm performs the fail-safe function and turns the other normal shift solenoid valves on/off. In case of an open or short circuit, the ecm stops sending current to the circuit (see page ax-31).
Monitor strategy

Typical enabling conditions

Typical malfunction thresholds

Component operating range

Wiring diagram

Inspection procedure
- Inspect transmission wire (shift solenoid valve s4)

- Disconnect the b27 wire connector.
- Measure the resistance of the transmission wire.
Standard resistance 


- Check wire harness (transmission wire - ecm)

- Disconnect the b30 ecm connector.
- Measure the resistance of the wire harness side connector.
Standard resistance 


Replace ecm
- Inspect shift solenoid valve s4
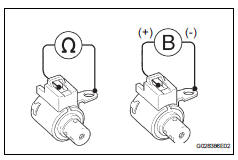
- Remove the shift solenoid valve s4.
- Measure the resistance of the solenoid valve.
Standard resistance:
11 to 15  at 20°c (68°f)
- Connect the battery's positive (+) lead to the terminal of the solenoid valve connector, and the negative (-) lead to the solenoid body. Then check that the valve moves and makes an operating noise.
Ok: valve moves and makes operating noise.


Repair or replace transmission wire
 Intermediate shaft speed sensor "A"
Description
This sensor detects the rotation speed of the counter gear. By comparing the
counter gear speed signal
(nc) with the direct clutch speed sensor signal (nt), the ecm detects the shi ...
 Pressure control solenoid "d" performance (shift solenoid valve slt)
Description
The throttle pressure that is applied to the primary regulator valve (which
modulates the line pressure)
causes the solenoid valve slt, under electronic control, to precisely m ...
Other materials:
Rear drive shaft assembly
Components
Removal
Hint:
Use the same procedures for the rh side and lh side.
The procedures listed below are for the lh side.
Disconnect cable from negative battery
terminal
Caution:
Wait at least 90 seconds after disconnecting the
cable from the negative (-) battery termin ...
Starter relay
On-vehicle inspection
Disconnect cable from negative battery
terminal
Caution:
Wait at least 90 seconds after disconnecting the
cable from the negative (-) battery terminal to
prevent airbag and seat belt pretensioner activation.
Remove starter relay
Remove the starter relay fr ...
Thermostat
Components
Removal
Remove no. 1 Engine under cover
Drain engine coolant (see page co-6)
Remove radiator support opening cover
Disconnect no. 2 Radiator hose
Remove water inlet
Remove the 2 nuts and disconnect the water inlet
from the cylinder block.
Remove thermostat
...
