Toyota RAV4 (XA50) 2019-2026 Owners Manual: Wireless remote control/electronic key battery
Replace the battery with a new one if it is depleted.
â– If the key battery is depleted
The following symptoms may occur:
- The smart key system (if equipped) and wireless remote control will not function properly.
- The operational range will be reduced.
Items to prepare
Prepare the following before replacing the battery:
- Flathead screwdriver
- Small flathead screwdriver
- Lithium battery CR2032
â– Use a CR2032 lithium battery
- Batteries can be purchased at your Toyota dealer, local electrical appliance shops or camera stores.
- Replace only with the same or equivalent type recommended by the manufacturer.
- Dispose of used batteries according to the local laws.
Replacing the battery
Vehicles without smart key system
1. Remove the cover.
Use a screwdriver of an appropriate size. Forcedly prying may cause the cover damaged.
To prevent damage to the key, cover the tip of the screwdriver with a rag.
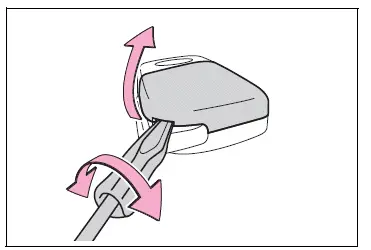
2. Remove the battery cover.
If the battery cover is difficult to remove, lift the edge to remove it.
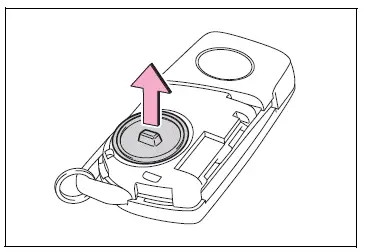
3. Remove the depleted battery.
When removing the battery, use a screwdriver of an appropriate size.
Insert a new battery with the "+" terminal facing up.
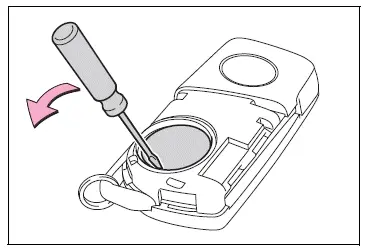
4. Install the battery cover with the tab facing up.
Push the entire edge of the battery cover into the key.
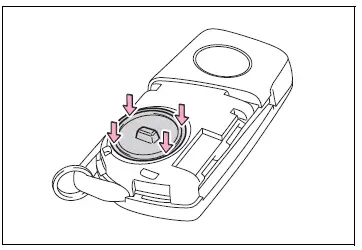
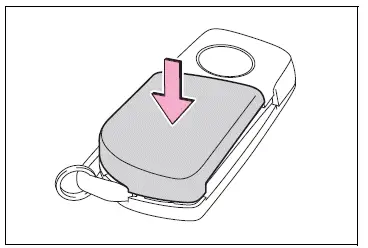
5. Install the key cover.
Align the key cover with the key and then press it straight into the key.
Make sure that the key cover is securely installed without any gaps between it and the key.
Vehicles with smart key system
1. Release the lock and remove the mechanical key.
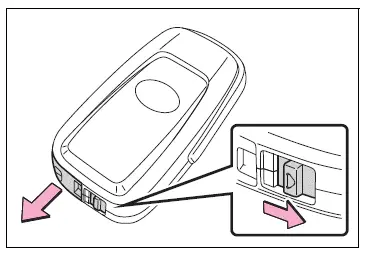
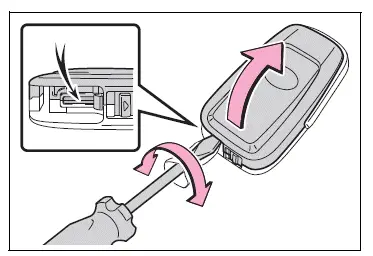
2. Remove the key cover.
Use a screwdriver of an appropriate size. Forcedly prying may cause the cover damaged.
To prevent damage to the key, cover the tip of the flathead screwdriver with a rag.
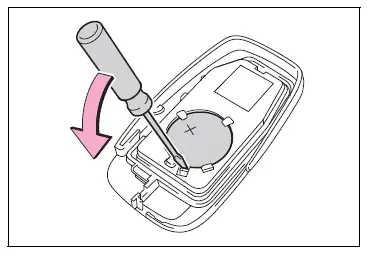
3. Remove the depleted battery using a small flathead screwdriver.
When removing the cover, the electronic key module may stick to the cover and the battery may not be visible. In this case, remove the electronic key module in order to remove the battery.
When removing the battery, use a screwdriver of an appropriate size.
Insert a new battery with the "+" terminal facing up.
4. When installing, reverse the steps listed.
WARNING
â– Battery precautions
Observe the following precautions.
Failure to do so may result in death or serious injury.
- Do not swallow the battery.
Doing so may cause chemical burns.
- A coin battery or button battery is used in the electronic key. If a battery is swallowed, it may cause severe chemical burns in as little as 2 hours and may result in death or serious injury.
- Keep away new and removed batteries from children.
- If the cover cannot be firmly closed, stop using the electronic key and stow the key in the place where children cannot reach, and then contact your Toyota dealer.
- If you accidentally swallow a battery or put a battery into a part of your body, get emergency medical attention immediately.
â– To prevent battery explosion or leakage of flammable liquid or gas
- Replace the battery with a new battery of the same type. If a wrong type of battery is used, it may explode.
- Do not expose batteries to extremely low pressure due to high altitude or extremely high temperatures.
- Do not burn, break or cut a battery.
NOTICE
â– For normal operation after replacing the battery
Observe the following precautions to prevent accidents:
- Always work with dry hands.
Moisture may cause the battery to rust.
- Do not touch or move any other component inside the remote control.
- Do not bend either of the battery terminals.
 Wiper insert replacement
When replacing the wiper
insert, perform the following
procedure to operate each
wiper.
Windshield wipers
â– Windshield wiper blade
removal and installation
1. While holding the hook portion A
of the ...
 Checking and replacing fuses
If any of the electrical components
do not operate, a
fuse may have blown. If this
happens, check and replace
the fuses as necessary.
Checking and replacing
fuses
1. Turn the engine switch to
OFF.
2. ...
Other materials:
Replacement
Replace intake valve guide bush
Heat the cylinder head to 80 to 100°c (176 to
212°f).
Place the cylinder head on wooden blocks.
Using sst and a hammer, tap out the guide bush.
Sst 09201-10000 (09201-01050), 09950-70010
(09951-07100)
Heat the cylinder head to 80 to 10 ...
Vc output circuit
Description
The ecm constantly generates 5 v power from the battery voltages supplied to
the +b (batt) terminal to
operate the microprocessor. The ecm also provides this power to the sensors
through the vc output
circuit.
When the vc circuit is short-circuited, the microprocessor in the ...
Active test
Hint:
Performing an active test enables components
including the relays, vsv (vacuum switching valve) and
actuators, to be operated without removing any parts.
The active test can be performed with the intelligent
tester. Performing the active test as the first step of
troubleshooting is one ...
