Toyota RAV4 (XA50) 2019-2026 Owners Manual: Driving in vehicle-to-vehicle distance control mode
This mode employs a radar to detect the presence of vehicles up to approximately 328 ft. (100 m) ahead, determines the current vehicle-to- vehicle following distance, and operates to maintain a suitable following distance from the vehicle ahead. The desired vehicle-to-vehicle distance can also be set by operating the vehicle-to-vehicle distance switch.
When driving on downhill slopes, the vehicle-to-vehicle distance may become shorter.
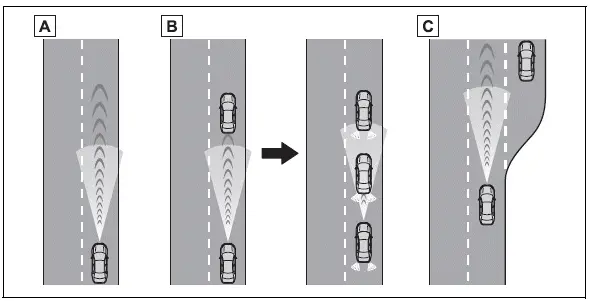
- Example of constant speed cruising When there are no vehicles ahead The vehicle travels at the speed set by the driver.
- Example of deceleration cruising and follow-up cruising When a preceding vehicle driving slower than the set speed appears
When a vehicle is detected running ahead of you, the system automatically decelerates your vehicle. When a greater reduction in vehicle speed is necessary, the system applies the brakes (the stop lights will come on at this time). The system will respond to changes in the speed of the vehicle ahead in order to maintain the vehicle-to-vehicle distance set by the driver.
Approach warning warns you when the system cannot decelerate sufficiently to prevent your vehicle from closing in on the vehicle ahead.
When the vehicle ahead of you stops, your vehicle will also stop (vehicle is stopped by system control). After the vehicle ahead starts off, pressing the "+RES" switch or depressing the accelerator pedal (start-off operation) will resume follow-up cruising. If the start-off operation is not performed, system control continues to keep your vehicle stopped.
When the turn signal lever is operated and your vehicle moves to an overtaking lane while driving at 50 mph (80 km/h) or more, the vehicle will accelerate to help to overtake a passing vehicle.
The system's identification of what is an overtaking lane may be determined solely based on the location of the steering wheel in the vehicle (left side driver position versus right side driver position.) If the vehicle is driven to a region where the overtaking lane is on a different side from where the vehicle is normally driven, the vehicle may accelerate when the turn signal lever is operated in the opposite direction to the overtaking lane (e.g., if the driver normally operates the vehicle in a region where the overtaking lane is to the right but then drives to a region where the overtaking lane is to the left, the vehicle may accelerate when the right turn signal is activated).
- Example of acceleration When there are no longer any preceding vehicles driving slower than the set speed
The system accelerates until the set speed is reached. The system then returns to constant speed cruising.
Setting the vehicle speed (vehicle-to-vehicle distance control mode)
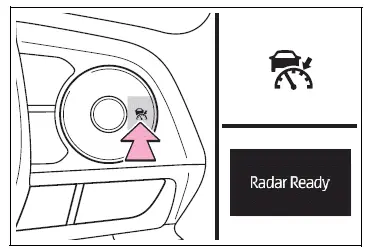
1. Press the cruise control main switch to activate the cruise control.
Dynamic radar cruise control indicator will come on and a message will be displayed on the multi-information display. Press the switch again to deactivate the cruise control.
If the cruise control main switch is pressed and held for 1.5 seconds or more, the system turns on in constant speed control mode.
2. Accelerate or decelerate, with accelerator pedal operation, to the desired vehicle speed (at or above approximately 20 mph [30 km/h] ) and press the "-SET" switch to set the speed.
Cruise control "SET" indicator will come on.
The vehicle speed at the moment the switch is released becomes the set speed.
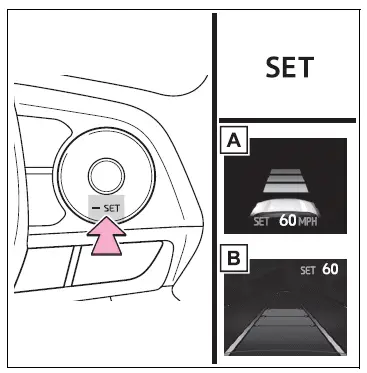
- Vehicles with 7-inch multi-information display
- Vehicles with 12.3-inch multi-information display
Adjusting the set speed
- Adjusting the set speed by the switch
To change the set speed, press the "+RES" or "-SET" switch until the desired set speed is displayed.
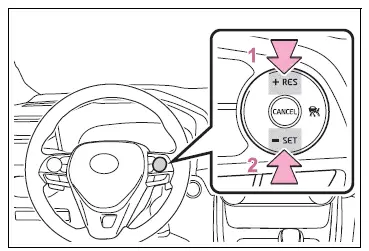
- Increases the speed (Except when the vehicle has been stopped by system control in vehicle-to-vehicle distance control mode)
- Decreases the speed
Fine adjustment: Press the switch.
Large adjustment: Press and hold the switch to change the speed, and release when the desired speed is reached.
In the vehicle-to-vehicle distance control mode, the set speed will be increased or decreased as follows:
For the U.S. mainland and Hawaii
Fine adjustment: By 1 mph (1.6 km/h)*1 or 1 km/h (0.6 mph)*2 each time the switch is pressed
Large adjustment: Increases or decreases in 1 mph (1.6 km/h)*1 or 1 km/h (0.6 mph)*2 increments for as long as the switch is held
Except for the U.S. mainland and Hawaii
Fine adjustment: By 1 mph (1.6 km/h)*1 or 1 km/h (0.6 mph)*2 each time the switch is pressed
Large adjustment: Increases or decreases in 5 mph (8 km/h)*1 or 5 km/h (3.1 mph)*2 increments for as long as the switch is held
In the constant speed control mode, the set speed will be increased or decreased as follows:
Fine adjustment: By 1 mph (1.6 km/h)*1 or 1 km/h (0.6 mph)*2 each time the switch is pressed
Large adjustment: The speed will continue to change while the switch is held.
*1:When the set speed is shown in
"MPH"
*2:When the set speed is shown in
"km/h"
- Increasing the set speed by the accelerator pedal (AWD models only)
1. Accelerate with accelerator pedal operation to the desired vehicle speed
2. Press the "-SET" switch
Changing the vehicle-to-vehicle distance (vehicle-to- vehicle distance control mode)
Pressing the switch changes the vehicle-to-vehicle distance as follows:
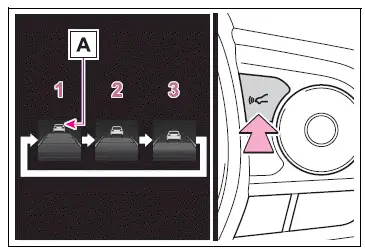
- Long
- Medium
- Short
If a vehicle is running ahead of you, the preceding vehicle mark A will also be displayed.
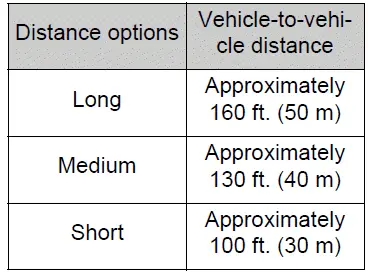
Vehicle-to-vehicle distance settings (vehicle-to-vehicle distance control mode)
Select a distance from the table below. Note that the distances shown correspond to a vehicle speed of 50 mph (80 km/h).
Vehicle-to-vehicle distance increases/decreases in accordance with vehicle speed. When the vehicle is stopped by system control, the vehicle stops at a certain vehicle-to-vehicle distance depending on the situation.
Resuming follow-up cruising when the vehicle has been stopped by system control (vehicle-to-vehicle distance control mode)
After the vehicle ahead of you starts off, press the "+RES" switch.
Your vehicle will also resume follow-up cruising if the accelerator pedal is depressed after the vehicle ahead of you starts off.
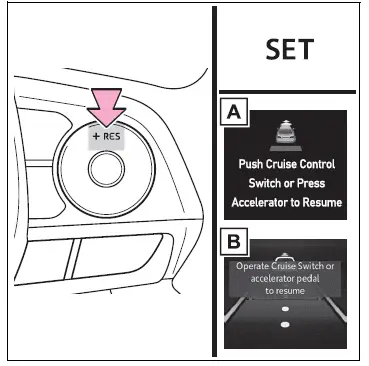
- Vehicles with 7-inch multi-information display
- Vehicles with 12.3-inch multi-information display
 Dynamic radar cruise control
with full-speed range
In vehicle-to-vehicle distance
control mode, the
vehicle automatically accelerates,
decelerates and
stops to match the speed
changes of the preceding
vehicle even if the accelerator
pedal is not depre ...
 Canceling and resuming
the speed control
Pressing the cancel switch
cancels the speed control.
The speed control is also canceled
when the brake pedal is depressed.
(When the vehicle has been
stopped by system control,
depressing the b ...
Other materials:
Head restraints
Head restraints are provided
for all seats.
WARNING
â– Head restraint precautions
Observe the following precautions
regarding the head restraints.
Failure to do so may result in
death or serious injury.
Use the head restraints
designed for each respective
seat.
Adjust the head restraints to th ...
RCTA (Rear Cross Traffic
Alert) function
The RCTA function uses the
BSM rear side radar sensors
installed behind the rear
bumper. This function is
intended to assist the driver
in checking areas that are
not easily visible when
backing up.
WARNING
â– Cautions regarding the use of
the system
The driver is solely responsible for
safe driving ...
Installation
Install water pump assembly
Remove any old seal packing material from the
contact surface.
Apply a continuous line of seal packing as shown in
the illustration.
Seal packing:
toyota genuine seal parking black, three
bond 1207b or equivalent
Standard seal diameter:
2.2 To 2. ...
