Toyota RAV4 (XA40) 2013-2018 Service Manual: Differential oil seal
Components
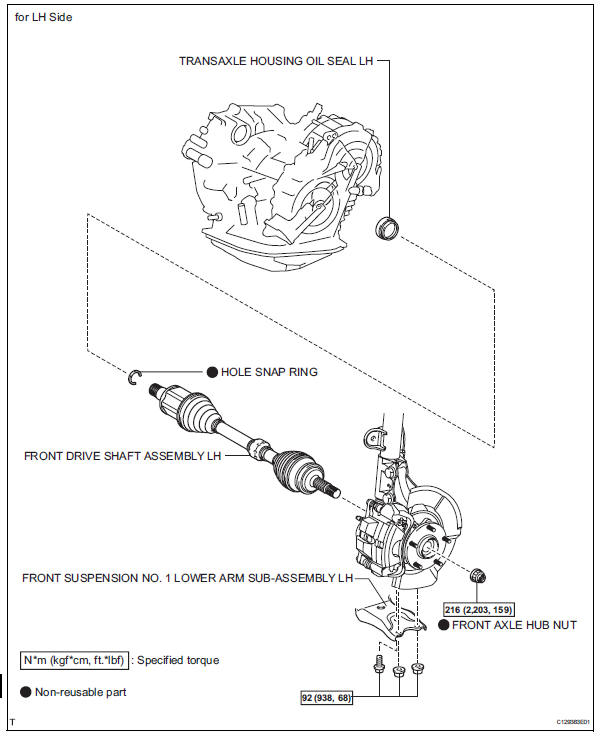

Replacement
- Replace transaxle housing oil seal lh
- Drain the automatic transaxle fluid.
- Remove the drain plug and gasket, and drain atf.
- Install a new gasket and drain plug.
Torque: 47 n*m (479 kgf*cm, 35 ft.*Lbf)
- Remove the front drive shaft lh (see page ds-41).
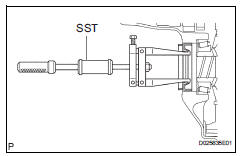
- Remove the transaxle housing oil seal lh.
- Using sst, tap out the oil seal.
Sst 09308-00010
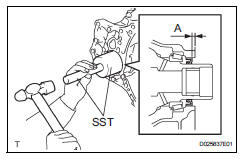
- Install a new transaxle housing oil seal lh.
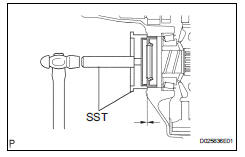
- Coat the lip of a new oil seal with mp grease.
- Using sst and a hammer, tap in the oil seal.
Sst 09726-27012 (09726-02041), 09950- 70010 (09951-07200, 09951-07200)
Standard depth: 0 +-0.5 Mm (0 +-0.020 In.)
- Install the front drive shaft lh (see page ds-65).
- Add automatic transaxle fluid.
Fluid type: toyota genuine atf ws
- Inspect the transaxle fluid level (see page ax-102).
- Replace transaxle housing oil seal rh
- Remove the engine with transaxle (see page em- 98).
- Drain the automatic transaxle fluid.
- Remove the drain plug and gasket, and drain atf.
- Install a new gasket and the drain plug.
Torque: 47 n*m (479 kgf*cm, 35 ft.*Lbf)
- Remove the 3 bolts and drive shaft bearing bracket.
- Remove the 3 bolts and engine mount bracket rr.
- Remove the transfer assembly (see page tf-59).
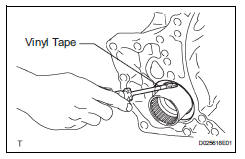
- Remove the transaxle housing oil seal rh.
- Using a screwdriver with vinyl tape wound around its tip, remove the oil seal.
Notice:
Be careful not to damage the housing.
- Install a new transaxle housing oil seal rh.
- Coat the lip of a new oil seal with mp grease.
- Using sst and a hammer, tap in the oil seal.
Sst 09309-37010 standard depth: 6.0 +-0.5 Mm (0.236 +-0.020 In.)
- Install the transfer assembly (see page tf-75).
- Install the engine mount bracket rr with the 3 bolts.
Torque: 64 n*m (652 kgf*cm, 47 ft.*Lbf)
- Install the drive shaft bearing bracket with the 3 bolts.
Torque: 64 n*m (653 kgf*cm, 47 ft.*Lbf)
- Install the engine with transaxle (see page em-105).
- Add automatic transaxle fluid.
Fluid type: toyota genuine atf ws
- Inspect the fluid level (see page ax-102).
 Floor shift assembly
Components
Removal
Disconnect cable from negative battery
terminal
Caution:
Wait at least 90 seconds after disconnecting the
cable from the negative (-) battery terminal to
preven ...
 Automatic transaxle assembly
Components
Removal
Remove engine assembly with transaxle
Remove the engine with transaxle (see page em-
98).
Drain automatic transaxle fluid
Remove the drain plug and gask ...
Other materials:
Selecting shift ranges in the s position
To enter s mode, shift the shift lever to s. Shift ranges can be selected
by operating the shift lever, allowing you to drive in the shift range of
your choosing. The shift range can be selected by the shift lever.
Upshifting
Downshifting
The selected shift range, from 1 to
6, will be di ...
Forward clutch
Components
Disassembly
Inspect forward clutch (see page ax-227)
Remove forward multiple disc clutch disc
Using a screwdriver, remove the snap ring.
Remove the flange , 5 discs and 5 plates from the
input shaft.
Inspect forward multiple disc clutch disc (see page ax-228 ...
Audio system types
Vehicles with an entune premium audio with navigation
Refer to the ÔÇťnavigation and multimedia system ownerÔÇÖs
manualÔÇŁ.
Vehicles with an entune audio plus
Refer to the ÔÇťnavigation and multimedia system ownerÔÇÖs
manualÔÇŁ.
Vehicles with an entune audio
Vehicles ...
