Toyota RAV4 (XA40) 2013-2018 Service Manual: Inspection
- Inspect no. 1 Chain tensioner

- Check that the plunger moves smoothly when the ratchet pawl is raised with your finger.
- Release the ratchet pawl, then check that the plunger is locked in place by the ratchet pawl and does not move when pushed with your finger.
- Inspect chain sub-assembly

- Using a vernier caliper, measure the length of the 16 links with the chain fully stretched.
Maximum chain elongation: 122.6 Mm (4.827 In.)
If the chain elongation is greater than the maximum, replace the chain sub-assembly.
Hint:
Take the measurements at 3 or more places selected at random.
- Inspect no. 2 Chain sub-assembly
- Using a vernier caliper, measure the length of the 8 links with the chain fully stretched.
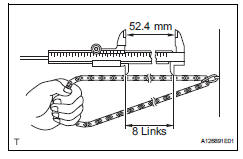
Maximum chain elongation: 52.4 Mm (2.063 In.)
If the chain elongation is greater than the maximum, replace the no. 2 Chain sub-assembly.
Hint:
Take the measurements at 3 or more places selected at random.
- Inspect chain tensioner slipper
- Using a vernier caliper, measure the tensioner slipper wear.
Maximum wear: 1.0 Mm (0.039 In.)

If the wear is greater than the maximum, replace the chain tensioner slipper.
- Inspect no. 1 Chain vibration damper

- Using a vernier caliper, measure the vibration damper wear.
Maximum wear: 1.0 Mm (0.039 In.)
If the wear is greater than the maximum, replace the no. 1 Chain vibration damper.
- Inspect crankshaft timing sprocket

- Wrap the chain around the timing sprocket.
- Using a vernier caliper, measure the timing gear diameter with the chain.
Minimum gear diameter (with chain): 51.6 Mm (2.031 In.)
Notice:
The vernier caliper must be in contact with the chain rollers when measuring.
If the gear diameter is less than the minimum, replace the chain sub-assembly and crankshaft timing sprocket.
- Inspect oil pump drive sprocket
- Wrap the chain around the drive sprocket.
- Using a vernier caliper, measure the drive gear diameter with the chain.

Minimum gear diameter (with chain): 48.2 Mm (1.898 In.)
Notice:
The vernier caliper must be in contact with the chain rollers when measuring.
If the gear diameter is less than the minimum, replace the no. 2 Chain sub-assembly and oil pump drive sprocket.
- Inspect oil pump drive shaft sprocket

- Wrap the chain around the drive shaft sprocket.
- Using a vernier caliper, measure the drive shaft gear diameter with the chain.
Minimum gear diameter (with chain): 48.2 Mm (1.898 In.)
Notice:
The vernier caliper must be in contact with the chain rollers when measuring.
If the gear diameter is less than the minimum, replace the no. 2 Chain sub-assembly and oil pump drive shaft sprocket.
 Removal
Disconnect cable from negative battery
terminal
Caution:
Wait at least 90 seconds after disconnecting the
cable from the negative (-) battery terminal to
prevent airbag and seat belt preten ...
 Replacement
Replace timing chain cover oil seal
Using a screwdriver and hammer, tap out the oil
seal.
Place the oil seal retainer on wooden blocks.
Apply multi-purpose grease to the lip of a ne ...
Other materials:
Short to gnd in can bus line
(2005/11-2006/01)
Description
There may be a short circuit between the can bus line and gnd when there is
resistance between
terminals 6 (canh) and 4 (cg) or terminals 14 (canl) and 4 (cg) of the dlc3.
Wiring diagram
Inspection procedure
Notice:
Turn the ignition switch off b ...
Air conditioning amplifier communication stop mode
Description
Wiring diagram
Inspection procedure
Notice:
Turn the ignition switch off before measuring the resistances
of the main wire and the branch
wire.
After the ignition switch is turned off, check that the key
reminder warning system and light
reminder warning sy ...
Master cylinder pressure sensor malfunction
Description
The master cylinder pressure sensor is connected to the skid control ecu in
the abs and traction
actuator.
Dtc c1281/81 can be detected when the master cylinder pressure sensor sends a
master cylinder
pressure signal or test mode ends. Dtc c1281/81 is output only in test mo ...
