
Toyota RAV4 (XA40) 2013-2018 Service Manual: Data list / active test
- Read data list
Hint:
Using the intelligent tester's data list allows switch, sensor, actuator, and other item values to be read without removing any parts. Reading the data list early in troubleshooting is one way to save time.
Notice:
In the table below, the values listed under "normal condition" are reference values. Do not depend solely on these reference values when deciding whether a part is faulty or not.
- Warm up the engine.
- Turn the ignition switch off.
- Connect the intelligent tester to the can vim. Then connect the can vim to the dlc3.
- Turn the ignition switch on and turn the tester on.
- Enter the following menus: diagnosis / enhanced obd ii / data list.
- Follow the instructions on the tester and read the data list.
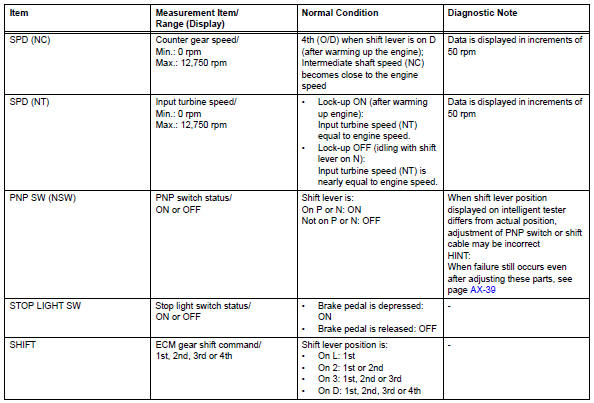
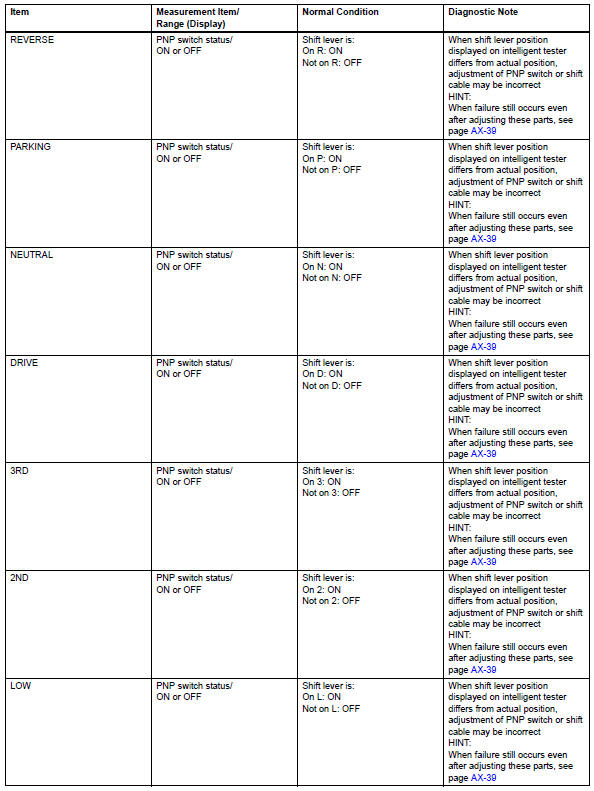
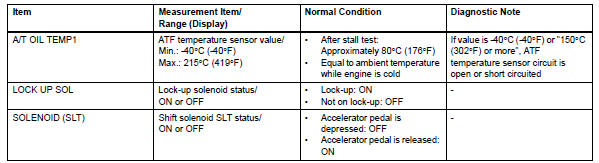
- Perform active test
Hint:
Performing the intelligent tester's active test allows relay, vsv, actuator and other items to be operated without removing any parts. Performing the active test early in troubleshooting is one way to save time.
The data list can be displayed during the active test.
- Warm up the engine.
- Turn the ignition switch off
- Connect the intelligent tester to the can vim. Then connect the can vim to the dlc3.
- Turn the ignition switch on and turn the tester on.
- Enter the following menus: diagnosis / enhanced obd ii / active test.
- Perform the active test.
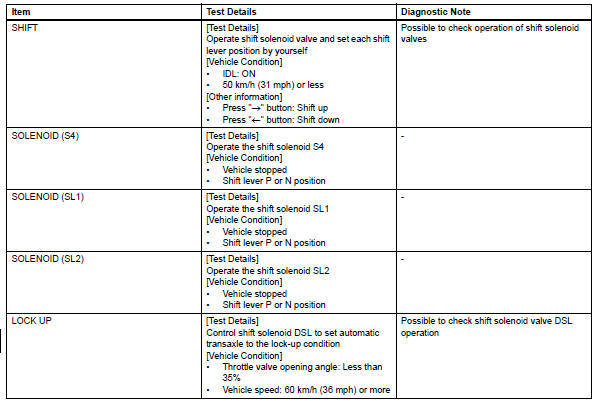
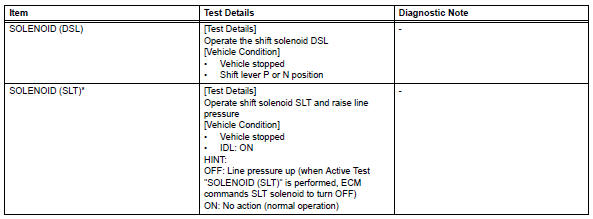
Hint:
*: "Solenoid (slt)" in the active test is performed to check the line pressure changes by connecting sst to the automatic transaxle, which is used in the hydraulic test (see page ax-16) as well. Please note that the pressure values in the active test and hydraulic test are different.
 Fail-safe chart
Fail-safe chart
This function minimizes the loss of the ect functions
when a malfunction occurs in a sensor or solenoid.
Automatic transmission fluid (atf) temperature
sensor:
when the ...
 Diagnostic trouble code chart
If a dtc is displayed during the dtc check, check the circuit
listed in the table below and proceed to the page given.
Hint:
*1: "Comes on" means the malfunction indicator lamp
(mil) ...
Other materials:
Headlight switch
The headlights can be operated
manually or automatically.
Turning on the headlights
Operating the switch
turns on the lights as follows:
U.S.A. (Type A)
The side marker, parking,
tail, license plate, instrument
panel lights, and
daytime running lights turn on.
The headlights and all
light ...
Parts location
System diagram
Hint:
The abs and traction actuator (skid control ecu)
detects and stores steering sensor and yaw rate
sensor dtcs and performs dtc communication by
receiving information from the steering sensor and
yaw rate sensor.
The ecm uses the can communication sy ...
Removal (2006/01- )
Disconnect cable from negative battery
terminal
Caution:
Wait at least 90 seconds after disconnecting the
cable from the negative (-) battery terminal to
prevent airbag and seat belt pretensioner activation.
Remove roof headlining assembly
Remove the roof headlining (see page ir ...
