Toyota RAV4 (XA40) 2013-2018 Service Manual: Disassembly
- Remove sliding roof drive gear subassembly
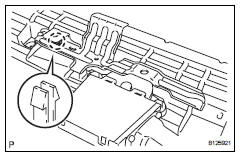
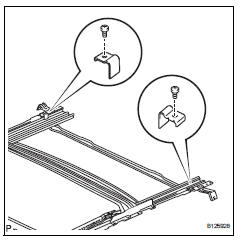
- Remove the claw and room light bracket.
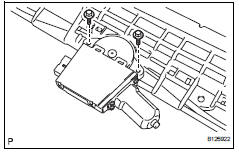
- Remove the 2 bolts and drive gear.
- Remove sliding roof drain hose joint lh
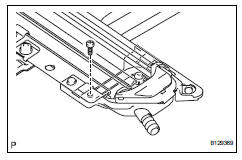
- Remove the screw and joint.
- Remove sliding roof drain hose joint rh
Hint:
Use the same procedures described for the lh side.
- Remove sunshade trim sub-assembly
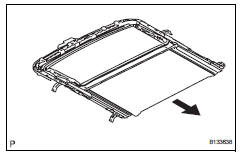
- Slide and remove the sunshade trim sub-assembly.
- Remove sliding roof drive cable
Notice:
Do not disassemble the sliding roof drive cable subassembly except when replacing it.
- Remove the 2 screws and 2 sliding roof side stoppers.

- Using a screwdriver, detach the 2 claws. Then slide the drip channel rearward to remove it.
Hint:
Tape the screwdriver tip before use.
- Using a screwdriver, slide the drive cables backward and remove them.
Hint:
- Tape the screwdriver tip before use.
 Removal (2006/01- )
Disconnect cable from negative battery
terminal
Caution:
Wait at least 90 seconds after disconnecting the
cable from the negative (-) battery terminal to
prevent airbag and seat belt preten ...
 Reassembly
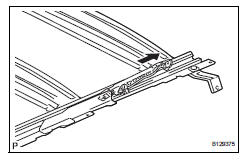
Install sliding roof drive cable
Using a screwdriver, slide the sliding roof drive
cable sub-assemblies in the direction indicated by
the arrow in the illustration to install them.
...
Other materials:
Disassembly (2006/01- )
Remove front axle inboard joint boot no. 2 Clamp
One touch type:
using a screwdriver, remove the inboard joint boot
clamp, as shown in the illustration.
Claw engagement type:
using needle-nose pliers, remove the inboard joint
boot clamp, as shown in the illustration.
Rem ...
Turning the high beam on/off manually
Switching to low beam
Pull the lever to original position.
Switching to high beam
Turn the light switch to
position.
The automatic high beam indicator
will turn off and the high
beam indicator will turn on.
The automatic high beam can be operated when
Vehicles without a smart ke ...
Installation
Install knock sensor
Install the sensor with the nut.
Torque: 20 n*m (205 kgf*cm, 15 ft.*Lbf)
Notice:
Make sure that the knock sensor is in the
correct position.
Connect the sensor connector.
Install intake manifold insulator
install the intake manifold insulat ...
