Toyota RAV4 (XA40) 2013-2018 Service Manual: Reassembly
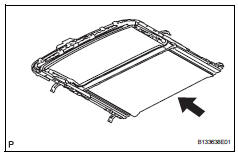
- Install sliding roof drive cable
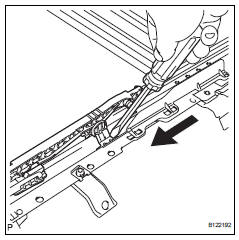
- Using a screwdriver, slide the sliding roof drive cable sub-assemblies in the direction indicated by the arrow in the illustration to install them.
Hint:
Tape the screwdriver tip before use.
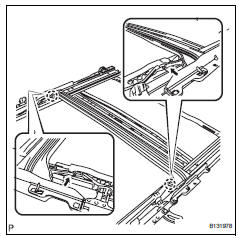
- Engage the 2 claws and install the sliding roof drip channel.
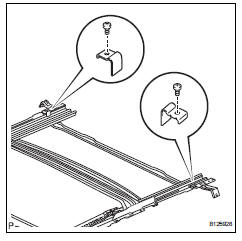
- Install the 2 sliding roof side stoppers with the 2 screws.
Torque: 2.0 N*m (20 kgf*cm, 18 in.*Lbf)
- Adjust fully closed position
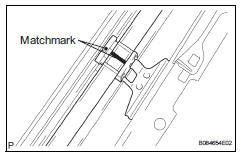
- Using a screwdriver, slide the sliding roof drive cable lh and rh to align the matchmarks.
Hint:
Tape the screwdriver tip before use.
- Install sunshade trim sub-assembly
- Insert the sunshade trim into the sliding roof housing.
- Install sliding roof drain hose joint lh
- Install the joint with the screw.
Torque: 2.0 N*m (20 kgf*cm, 18 in.*Lbf)
- Install sliding roof drain hose joint rh
Hint:
Use the same procedures described for the lh side.
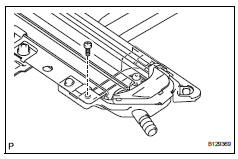
- Install sliding roof drive gear subassembly
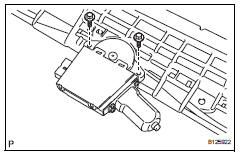
- Install the drive gear with the 2 bolts.
Torque: 5.4 N*m (55 kgf*cm, 48 in.*Lbf)
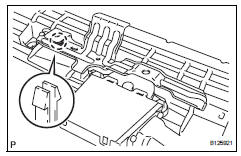
- Attach the claw and install the sliding roof drive gear bracket.
 Disassembly
Remove sliding roof drive gear subassembly
Remove the claw and room light bracket.
Remove the 2 bolts and drive gear.
Remove sliding roof drain hose joint lh
Rem ...
 Installation (2005/11-2006/01)
Install sliding roof weatherstrip
Install the sliding roof weatherstrip.
Position the joint of the weatherstrip at the rear
center.
Align the marks on the weatherstrip with the
...
Other materials:
Rear wiper rubber
Components
Removal
Remove rear wiper blade assembly
Rotate and remove the cap as described in the
"remove" procedures.
Raise the arm and blade.
Raise the wiper blade to the position where the claw
detach with a ''click'' sound, as shown in the
illustrat ...
Removal (2005/11-2006/01)
Disconnect cable from negative battery
terminal
Caution:
Wait at least 90 seconds after disconnecting the
cable from the negative (-) battery terminal to
prevent airbag and seat belt pretensioner activation.
Remove front door scuff plate lh
Using a screwdriver, detach the 10 cla ...
Terminals of ecu (2005/11-2006/01)
Check air conditioning amplifier
Measure the voltage and resistance of the
connectors.
Hint:
Check from the rear of the connector while it is
connected to the air conditioning amplifier.
Using an oscilloscope, check waveform 1.
Compressor and pulley operation signa ...
