Toyota RAV4 (XA40) 2013-2018 Owners Manual: Screen for general settings
- Press the “setup” button.
- Select “general” on the “setup” screen.
- ‚ÄúEnglish‚Äù, ‚Äúfrançais‚Äù or ‚Äúespañol‚Äù can be selected.
- On/off can be selected to sound beeps.
- Select to change the screen color.
- Select to change the keyboard layout.
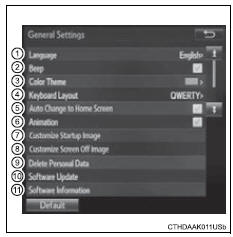
- Select to set automatic screen changes from the audio control screen to the home screen on/off. When set to on, the screen will automatically return to the home screen from the audio control screen after 20 seconds.
- The animation effect for the screen can be set to on/off.
- Select to customize the startup images.
- Select to customize the screen off images.
- Select to delete personal data
- Select to update program versions. For details, contact your toyota dealer.
- Select to display the software information. Notices related to third party software used in this product are enlisted. (This includes instructions for obtaining such software, where applicable.)
To return to the default settings
Select “default”, and then “yes”.
 General settings
Settings are available for adjusting the operation sounds,
screen animation, etc. ...
 Customizing the startup and screen off images (if equipped)
An image can be copied from a usb memory and used as the startup
and screen off images.
When the engine switch is in the “acc” or “on” position (vehicles
without a smart key system) or ac ...
Other materials:
Reassembly
Hint:
When installing the ornament plate and emblem, heat the
radiator grille, ornament plate and emblem using a heat light.
Standard heating temperature
Notice:
Do not heat the radiator grille, ornament plate and
emblem excessively.
Install radiator grille emblem
Attach ...
Types of child restraints
Child restraint systems are classified into the following 3 types
according to the age and size of the child:
Rear facing „o infant seat/convertible
seat
Forward facing „o convertible
seat
Booster seat
Selecting an appropriate child restraint system
Use a child restraint ...
Terminals of ecu (2005/11-2006/01)
Check air conditioning amplifier
Measure the voltage and resistance of the
connectors.
Hint:
Check from the rear of the connector while it is
connected to the air conditioning amplifier.
Using an oscilloscope, check waveform 1.
Compressor and pulley operation signa ...
