Toyota RAV4 (XA40) 2013-2018 Service Manual: Replacement
- Replace timing chain cover oil seal
Hint:
There are 2 methods to replace the oil seal.
- If the timing chain cover is removed from the cylinder block:
- Using a screwdriver and hammer, tap out the oil seal.
- Apply multi-purpose grease to the lip of a new oil seal.
Notice:
Keep the lip free of foreign objects.
- Using sst and a hammer, tap in the new oil seal until its surface is flush with the timing chain cover edge.
Sst 09223-22010
Notice:
Do not tap the oil seal at an angle.
- If the timing chain cover oil seal is installed to the cylinder block:
- Remove the fan and generator v belt (see page em-6).
- Remove the crankshaft pulley (see page em- 25).
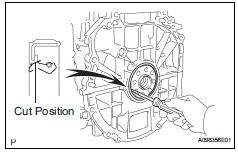
- Using a knife, cut off the lip of the oil seal.
- Using a screwdriver with its tip wrapped with tape, pry out the oil seal.
Notice:
After removing, check the crankshaft for damage. If damaged, smooth the surface with 400-grit sandpaper.
- Apply multi-purpose grease to the lip of a new oil seal.
Notice:
Keep the lip free of foreign objects.
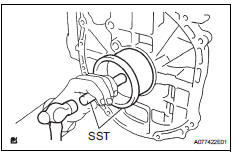
- Using sst and a hammer, tap in the new oil seal until its surface is flush with the timing chain cover edge.
Sst 09223-22010
Notice:
Do not tap the oil seal at an angle.
- Install the crankshaft pulley (see page em-38).
- Install the fan and generator v belt (see page em-7).
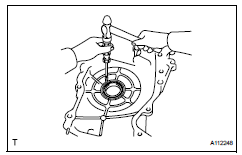
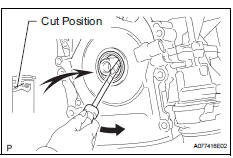
- Replace engine rear oil seal
- Using a knife, cut off the lip of the oil seal.
- Using a screwdriver with its tip wrapped with tape, pry out the oil seal.
Notice:
After removing, check the crankshaft for damage. If damaged, smooth the surface with 400-grit sandpaper.
- Apply multi-purpose grease to the lip of a new oil seal.
Notice:
Keep the lip free of foreign objects.
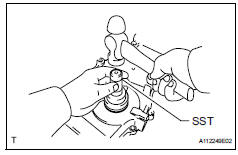
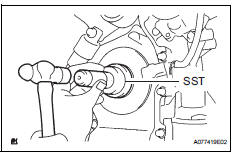
- Using sst and a hammer, tap in the new oil seal until its surface is flush with the rear oil seal retainer edge.
Sst 09223-15030, 09950-70010 (09951-07100)
Notice:
- Wipe any extra grease off the crankshaft.
- Do not tap the oil seal at an angle.
- Replace stud bolt (for cylinder block)
Notice:
If the stud bolt is deformed or the threads are damaged, replace it.
- Remove the 8 stud bolts.
- Install the 8 stud bolts into the cylinder block.
Torque 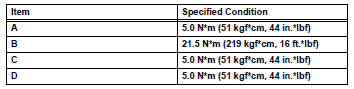
- Replace tight plug (for cylinder block)
Notice:
If water leaks from the tight plug or the plug corrodes, replace it.
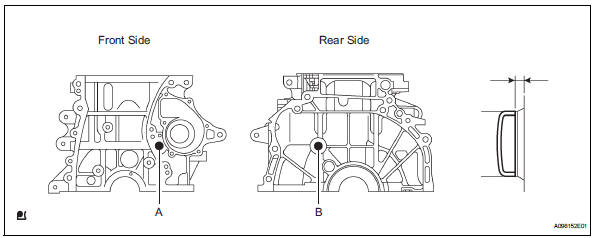
- Remove the 2 tight plugs from the engine front and rear side.
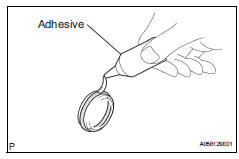
- Apply adhesive around new tight plugs.
Adhesive:
Toyota genuine adhesive 1342, three bond 1342 or equivalent
- Using sst, install the 2 tight plugs.
Sst 09950-60010 (09951-00200), 09950-70010 (09951-07100)
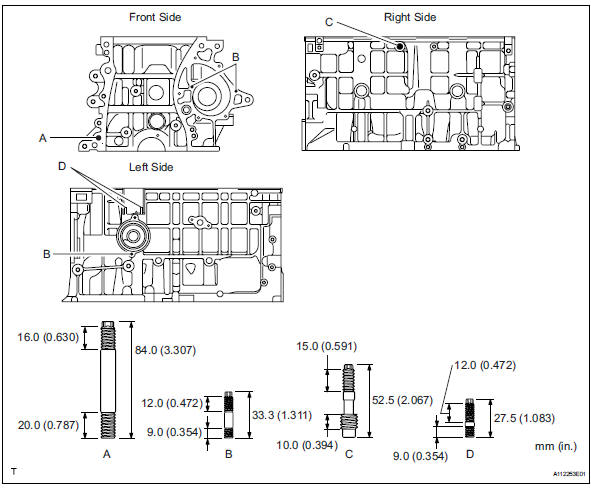
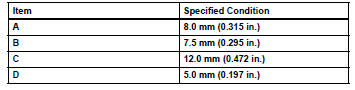
Standard depth

- Replace ring pin (for cylinder block)
Notice:
It is not necessary to remove with head pin unless it is being replaced.
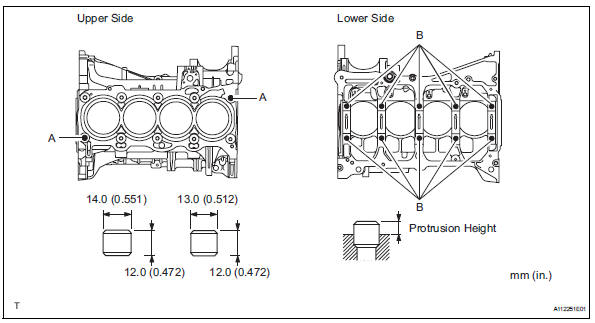
- Remove the 12 ring pins.
- Using a plastic-faced hammer, install 12 new ring pins.
Standard protrusion height

- Replace straight pin (for cylinder block)
Notice:
It is not necessary to remove with straight pin unless it is being replaced.
- Remove the 8 straight pins.
- Using a plastic-faced hammer, install 8 new straight pins.
Standard protrusion height

 Inspection
Inspect cylinder block for warpage
Using a precision straightedge and feeler gauge,
measure the warpage of the surface that is in
contact with the cylinder head gasket.
Maximum war ...
 Reassembly
Install piston
Using a small screwdriver, install a new snap ring
onto one end of the piston pin hole.
Hint:
Make sure that the end gap of the snap ring is not
aligned with the pin ...
Other materials:
Evaporator temperatur sensor
Removal
Remove air conditioning unit
Remove the air conditioning radiator (see page ac-
185).
Remove evaporator temperature sensor
(see page ac-193)
Inspection
Inspect evaporator temperature sensor
Measure the resistance of the sensor.
Standard resistance
No ...
Settings display
Vehicle settings and the content
displayed on the screen can be
changed by using the meter
control switches.
â– Setting procedure
1. Operate or
of the
meter control switches and
select .
2. Operate or
of the
meter control switches and
select the desired item.
If the function is turned on and ...
On-vehicle inspection
Check throttle body
Check the throttle control motor operating sounds.
Turn the ignition switch on.
When pressing the accelerator pedal, check
the operating sound of the running motor. Make
sure that no friction noises emit from the motor.
If friction noise exists, replace t ...
