Toyota RAV4 (XA40) 2013-2018 Service Manual: Removal (2006/01- )
- Disconnect cable from negative battery terminal
Caution:
Wait at least 90 seconds after disconnecting the cable from the negative (-) battery terminal to prevent airbag and seat belt pretensioner activation.
- Remove air cleaner case sub-assembly (for 2az-fe)
- Remove the air cleaner case (see page em-98).
Hint:
Refer to the procedures from the removal of the purge vsv up until the removal of the air cleaner case.
- Remove air cleaner case (for 2gr-fe)
- Remove the air cleaner case (see page em-21).
Hint:
Refer to the procedures from the removal of the air cleaner cap sub-assembly up until the removal of the air cleaner case.
- Drain brake fluid
Notice:
Wash off brake fluid immediately if it comes in contact with any painted surface.
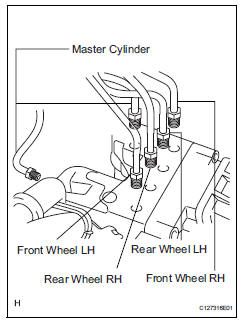
- Disconnect brake lines
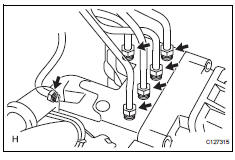
- Using sst, disconnect the 6 brake lines from the actuator.
Sst 09023-00101
- Place tags or marks to identify the installation locations of each brake line.
- Remove abs and traction actuator assembly with bracket
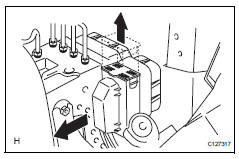
- Pull the lock lever upward and disconnect the connector.
- Disconnect the brake tube clamp from the bracket.
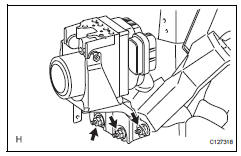
- Remove the 3 nuts and actuator with bracket.
Notice:
Be careful not to damage the brake tubes.
Disassembly
- Remove abs and traction actuator assembly
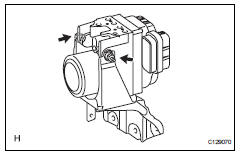
- Remove the 2 nuts and actuator from the bracket.
- Remove brake actuator bolt holder
- Remove the 2 bolt holders from the actuator.
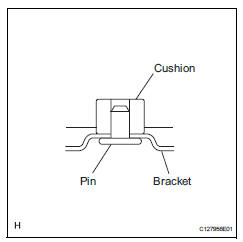
- Remove brake actuator bolt cushion
- Remove the 3 cushions from the actuator.
Reassembly
- Install brake actuator bolt cushion
- Install the 3 cushions to the actuator.
- Install brake actuator bolt holder
- Install the 2 bolt holders to the actuator.
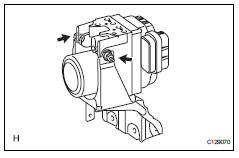
- Install abs and traction actuator assembly
Notice:
- Do not remove the hole plug before connecting the brake tube. New actuators are filled with brake fluid.
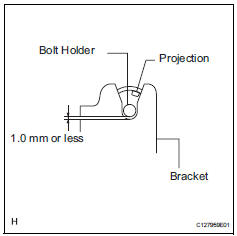
- The clearance between the bolt holder and bracket is less than 1.0 Mm (0.039 In.).
- The projection should be set as shown in the illustration.
- Install the 2 nuts to assemble the actuator and bracket.
Torque: 5.4 N*m (55 kgf*cm, 48 in.*Lbf)
 Removal (2005/11-2006/01)
Disconnect cable from negative battery
terminal
Caution:
Wait at least 90 seconds after disconnecting the
cable from the negative (-) battery terminal to
prevent airbag and seat belt prete ...
 Installation (2005/11-2006/01)
Install abs and traction actuator assembly with bracket
Notice:
Do not remove the hole plug before connecting the
brake tube. New actuators are filled with brake fluid.
Install the actuato ...
Other materials:
Short in front passenger side - side squib circuit
Description
The front passenger side - side squib circuit consists of the center airbag
sensor and the front seat side
airbag rh.
The circuit instructs the srs to deploy when the deployment conditions are met.
These dtcs are recorded when a malfunction is detected in the front passenge ...
Installation
Install fan and generator v belt
Using sst and 19 mm socket wrench, loosen the vribbed
belt tensioner arm clockwise, then install the
fan and generator v belt.
Sst 09216-42010
Notice:
Be sure to connect sst and the tools so that
they are in line during use.
When retracti ...
On-vehicle inspection
Check battery condition
Notice:
If the battery is weak or if the engine is difficult to
start, perform the following procedures.
Check the battery for damage and deformation. If
severe damage, deformation or leakage is found,
replace the battery.
Check the electrolyte quantity of e ...
