Toyota RAV4 (XA40) 2013-2018 Service Manual: Registration
- In case of tire pressure warning ecu replacement
- Read id stored in the old ecu using the intelligent tester.
- In case of tire pressure warning valve and transmitter and/or tire pressure warning ecu replacement
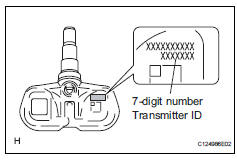
- Read the id written on the tire pressure monitor valve.
- Register transmitter id
Notice:
It is necessary to register the transmitter id in the tire pressure warning ecu when replacing the tire pressure warning valve and transmitter and/or tire pressure warning ecu.
- Prepare all of the transmitter id data before starting registration.
Hint:
- Read the registered transmitter ids that are stored in the ecu using the intelligent tester and make a note of them.
- If reading stored transmitter ids is impossible due to malfunctions of components such as the tire pressure warning antenna and receiver, remove the tires from the wheels and check the ids located on the tire pressure warning valves and transmitters (see page tw-60).
- When replacing the tire pressure warning valves and transmitters, make a note of the ids written on the tire pressure warning valves and transmitters.
- Connect the intelligent tester (with can vim) to the dlc3.
- Turn the ignition switch on.
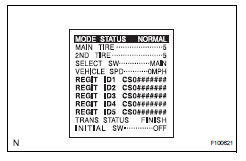
- *1: Read and write down the id (id1 to id5) by using the data list.
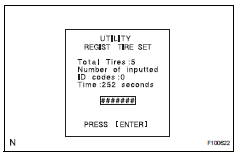
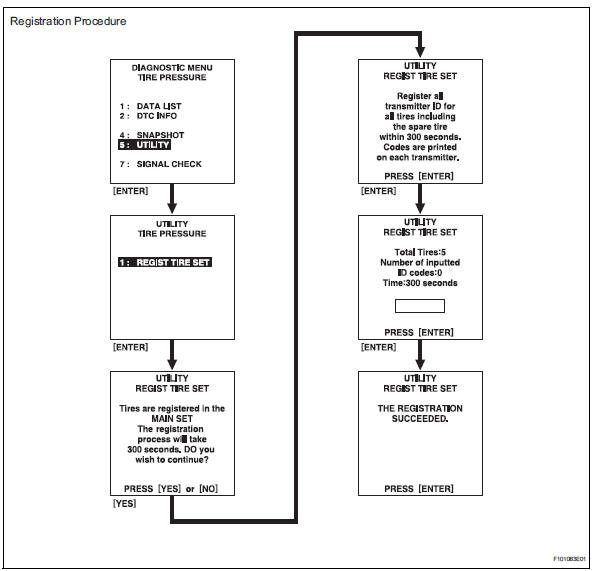
- *2: Select regist tire set following the intelligent tester screen (utility - regist tire set).
- *3: Select the registration mode "main".
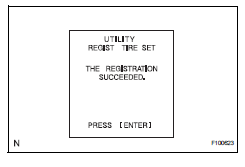
- Input the id (id1 to id5) using the intelligent tester and transmit it to the tire pressure warning ecu.
- Set the id transmission condition to "id registration is complete".
Hint:
- The previously registered ids will be deleted from the memory when the registration is completed.
- If the operations of *1 to *3 are not completed within 5 minutes, the mode will return to normal operation mode.
- Confirmation of transmitter id registration
- Set the tire pressure of all wheels (including the spare tire) to the specified value.
Standard pressure: 220 kpa (2.2 Kgf/cm2, 32 psi)
- Connect the intelligent tester (with can vim ) to the dlc3.
- Turn the ignition switch on.
- Select "signal check" mode on the intelligent tester (with can vim ) (see page tw-12).
- Confirm that the transmitter ids and tire pressure data for all the tires are displayed on the intelligent tester screen.
Notice:
- It may take up to 1 minute to update the tire pressure data.
- If the ids have not been registered, dtc c2171/71 is set in the tire pressure warning ecu after approximately 60 minutes.
 How to proceed with troubleshooting
Hint:
Use these procedures to troubleshoot the tire pressure
warning system.
*: Use the intelligent tester.
Vehicle brought to workshop
Inspect battery voltage
Standard volta ...
 Test mode procedure
Test mode check
Hint:
When entering the test mode, the tire pressure
warning ecu sets all the test dtcs first. After
completing the test mode for each inspection item, the
dtcs that ar ...
Other materials:
Theft deterrent system
Engine immobilizer system
The vehicle’s keys have built-in transponder chips that prevent
the engine from starting if a key has not been previously registered
in the vehicle’s on-board computer.
Never leave the keys inside the vehicle when you leave the vehicle.
This system is designed to ...
System description
Power door lock system description
The power door lock system locks / unlocks all
doors with a one-touch operation.
The door control switch of the power window
regulator master switch or door control switch on
passenger side sends lock / unlock request
signals to the main body ...
Inside rear view mirror
The rear view mirror’s position can be adjusted to enable sufficient
confirmation of the rear view.
Adjusting the height of rear view mirror
The height of the rear view mirror can be adjusted to suit your driving
posture.
Adjust the height of the rear view
mirror by moving it up and down.
...
