Toyota RAV4 (XA50) 2019-2025 Owners Manual: Registering ID codes (vehicles with tire pressure warning system)
Every tire pressure warning valve and transmitter has a unique ID code. When replacing a tire pressure warning valve and transmitter, it is necessary to register the ID code.
When registering the ID codes, perform the following procedure.
Ôľá Registering procedure (with 7-inch display)
1. Park the vehicle in a safe place, wait for approximately 20 minutes, and then start the engine.
2. Press  or
or
 of the meter
control switches on the steering
wheel and select  .
.
3. Press  or
or
 of the meter
control switches and select
"Vehicle Settings", and then
press and hold  .
.
4. Press  or
or
 of the meter
control switches and select
"TPWS", and then press  .
.
5. Press  or
or
 of the meter
control switches and select
"Change Wheel". Then press
and hold  until the tire
pressure warning light starts
slowly blinking 3 times.
The change wheel set mode is activated and registration is started.
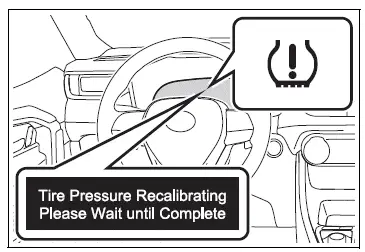
Then a message will be displayed on the multi-information display.
When registration is being performed, the tire pressure warning light will blink for approximately 1 minute then illuminate and "--" will be displayed for the inflation pressure of each tire on the multi-information display.

6. Drive straight (with occasional left and right turns) at approximately 25mph (40 km/h) or more for approximately 10 to 30 minutes.
When registration is completed, the tire pressure warning light will go off and the inflation pressure of each tire will be displayed on the multi-information display.
Even if the vehicle is not driven at approximately 25 mph (40 km/h) or more, registration can be completed by driving for a long time.
However, if registration does not complete after driving for 1 hour or more, perform the procedure again from the beginning.
7. Initialize the tire pressure warning system.
Ôľá Registering procedure (with 12.3-inch display)
1. Park the vehicle in a safe place, wait for approximately 20 minutes, and then start the engine.
2. Press and hold  to display
the cursor on the content display
area (center) of the
multi-information display.
3. Press  or
or
 of the meter
control switches to select 
and then press  .
.
4. Press  or
or
 of the meter
control switches and select
" Vehicle Settings", and
then press and hold  .
.
5. Press  or
or
 of the meter
control switches and select
"TPWS", and then press  .
.
6. Press  or
or
 of the meter
control switches and select
"Change Wheel". Then press
and hold  until the tire
pressure warning light starts
slowly blinking 3 times.
The change wheel set mode is activated and registration is started.
Then a message will be displayed on the multi-information display.
When registration is being performed, the tire pressure warning light will blink for approximately 1 minute then illuminate and "--" will be displayed for the inflation pressure of each tire on the multi-information display.
7. Drive straight (with occasional left and right turns) at approximately 25mph (40 km/h) or more for approximately 10 to 30 minutes.
When registration is completed, the tire pressure warning light will go off and the inflation pressure of each tire will be displayed on the multiinformation display.
Even if the vehicle is not driven at approximately 25 mph (40 km/h) or more, registration can be completed by driving for a long time.
However, if registration does not complete after driving for 1 hour or more, perform the procedure again from the beginning.
8. Initialize the tire pressure warning system.
ÔľáWhen registering ID codes
- ID code registration is performed while driving at a vehicle speed of approximately 25 mph (40 km/h) or more.
- Before performing ID code registration, make sure that no wheels with tire pressure warning valve and transmitters installed are near the vehicle.
- Make sure to initialize the tire pressure warning system after registering the ID codes. If the system is initialized before registering the ID codes, the initialized values will be invalid.
- ID codes can be registered by yourself, but depending on the driving conditions and driving environment, registration may take some time to complete.
- As the tires will be warm when registration is completed, make sure to allow the tires to cool before performing initialization.
ÔľáCanceling ID code registration
- To cancel ID code registration after it has been started, turn the engine switch to OFF before driving the vehicle. If the vehicle is driven after ID code registration is started, to cancel registration, perform the ID code registration start procedure again and turn the engine switch to OFF before driving.
- If ID code registration has been canceled, the tire pressure warning light will blink for approximately 1 minute when the engine switch is turned to ON and then illuminate. The tire pressure warning system will be operational when the tire pressure warning light turns off.
- If the warning light does not turn
off even after several minutes
have elapsed, ID code registration
may not have been canceled correctly.
To cancel registration, perform the ID code registration start procedure again and then turn the engine switch to OFF before driving.
ÔľáIf ID codes are not registered properly
In the following situations, ID code registration may take longer than usual to be completed or may not be possible. Normally, registration completes within approximately 30 minutes.
If ID code registration is not complete after driving for approximately 30 minutes, continue driving for a while.
- Vehicle is not parked for approximately 20 minutes or more before driving
- Vehicle is not driven at approximately 25 mph (40 km/h) or more
- Vehicle is driven on unpaved roads
- Vehicle is driven near other vehicles and system cannot recognize tire pressure warning valve and transmitters of your vehicle over those of other vehicles
- Wheel with tire pressure warning valve and transmitter installed is inside or near the vehicle
If registration does not complete after driving for 1 hour or more, perform the ID code registration procedure again from the beginning.
- If the vehicle is reversed during registration, the data up to that point is reset, so perform the registration procedure again from the beginning.
- In the following situations, ID code
registration will not be started or
was not completed properly and
the system will not operate properly.
Perform the ID code registration procedure again.
- If, when attempting to start ID code registration, the tire pressure warning light does not blink slowly 3 times.
- If, when the vehicle has been driven for about 20 minutes after performing ID code registration, the tire pressure warning light blinks for approximately 1 minute and then illuminates.
If the ID codes cannot be registered even when performing the above procedure, contact your Toyota dealer.
 Initializing the tire pressure
warning system (if
equipped)
Initializing the tire pressure
warning system (if
equipped)
Ôľá The tire pressure warning
system must be initialized
in the following circumstances:
When rotating the tires.
When changing the tire.
After registering the ID codes.
When the tire pressure wa ...
 Tire inflation pressure
Make sure to maintain the
proper tire inflation pressure.
Tire inflation pressure
should be checked at least
once per month. However,
Toyota recommends that
tire inflation pressure be
checked once ev ...
Other materials:
List of storage features
Glove box
Bottle holders
Console box
Cup holders
Storage boxes
Caution
Items that should not be left in the storage spaces
Do not leave glasses, lighters or spray cans in the storage spaces, as
this
may cause the following when cabin temperature becomes high:
Glasses may b ...
Brake
General maintenance
Inspect brake lines and hoses
Hint:
Work in a well-lighted area. Turn the front wheels fully to
the right or left before beginning the inspection.
Using a mirror, check the entire circumference and
length of the brake lines and hoses for:
Damage
Wear
...
Audio system types
Vehicles with an entune premium audio with navigation
Refer to the ÔÇťnavigation and multimedia system ownerÔÇÖs
manualÔÇŁ.
Vehicles with an entune audio plus
Refer to the ÔÇťnavigation and multimedia system ownerÔÇÖs
manualÔÇŁ.
Vehicles with an entune audio
Vehicles ...
