Toyota RAV4 (XA40) 2013-2018 Service Manual: Reassembly
Caution:
Wear protective gloves. Sharp areas on the seat frame (with adjuster) may injure your hands.
- Install front seat wire
- Install seat position airbag sensor (see page rs-390)
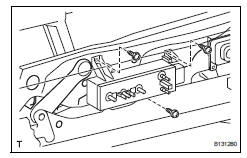
- Install lumbar support adjuster assembly

- Install the lumbar support adjuster with the 2 screws.
- Connect the connector.
- Install front seat cushion lower shield lh

- Attach the hook of the lower shield.
- Install the lower shield with the screw.
- Install front seat cushion lower shield rh
Hint:
Use the same procedures described for the lh side.
- Install reclining adjuster upper inside cover lh

- Install the inside cover with the screw.
- Install reclining adjuster upper inside cover rh
- Install the inside cover with the screw.
- Install reclining adjuster lower inside cover lh

- Attach the claw to install the inside cover.
- Install the 2 screws.
- Install reclining adjuster lower inside cover rh

Hint:
Use the same procedures described for the lh side.
- Install front seatback heater (w/ seat heater system)

- Using a tacker, install the seatback heater to the end of the seat cover with 6 new tack pins.
Notice:
Do not substitute other metal parts for tack pins.
- Install front seatback cover

Notice:
- Be careful not to damage the cover.
- When installing the hog rings, avoid wrinkling the cover.
- Using hog ring pliers, install the seatback cover to the seatback pad with 11 new hog rings.
- Install the seatback cover (with pad) to the seat frame (with adjuster).

- W/ front seat side airbag: fully cover the airbag with the 2 seatback cover brackets and install the nut.
Torque: 5.5 N*m (56 kgf*cm, 49 in.*Lbf)
Caution:
- For vehicles with side airbags, the seatback cover must be securely installed. Otherwise, the side airbags may not deploy properly.
- Make sure that the strap is not twisted after installing the bracket.
- Install the bracket securely.

- Attach the 4 claws to install the 2 headrest supports.

- Attach the hooks.
- Using hog ring pliers, install the seatback cover (with pad) with 5 new hog rings.
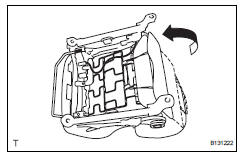
- Install front seatback board subassembly lh

- Push the seatback board in the direction indicated by the arrow in the illustration to attach the 2 claws.

- Open the lower part of the seatback board. Then install the seatback board with the 2 screws.
- Install front seat cushion heater (w/ seat heater system)

- Using a tacker, install the seat cushion heater to the end of the seat cover with 10 new tack pins.
Notice:
Do not substitute other metal parts for tack pins.
- Install front seat cushion cover

- Using hog ring pliers, install the seat cushion cover to the seat cushion pad with 15 new hog rings.
Notice:
- Be careful not to damage the cover.
- When installing the hog rings, avoid wrinkling the cover.
- Install the seat cushion cover (with pad) to the seat frame (with adjuster).

- Attach the hooks and install the 2 clips.
- W/ seat heater system: connect the connector.
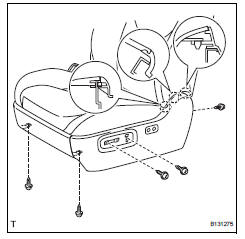
- Install front power seat switch
- Connect the connector.
- Install the switch with the 3 screws.
- Install front seat inner belt assembly lh (see page sb-23)
- Install front seat cushion inner shield lh

- Attach the clip and 3 claws to install the inner shield.
- Install the screw.
- Install front power seat lumbar switch

- Install the switch to the cushion shield with the 2 screws.
- Install front seat cushion shield lh

- Install the front no. 1 Seat cushion inner shield to the cushion shield.
- Attach the claw to install the front no. 1 Seat cushion inner shield.
- Install the screw.
- Connect the connector to the front power seat lumbar switch.
- Attach the 3 claws and install the cushion shield (with front no. 1 Seat cushion inner shield) to the seat frame (with adjuster).
- Install the 5 screws.
- Connect the 2 rubber bands of the front seatback board to the seat frame (with adjuster).
- Install slide and vertical power seat switch knob
- Install reclining power seat switch knob
 Disassembly
Caution:
Wear protective gloves. Sharp areas on the seat frame
(with adjuster) may injure your hands.
Remove reclining power seat switch knob
Using a screwdriver, detach the knob.
H ...
 Rear no. 1 Seat assembly (for lh side)
Components
...
Other materials:
Windshield wiper de-icer
This feature is used to prevent ice from building up on the windshield
and wiper blades.
On/off
The windshield wiper de-icer will
automatically turn off after approximately
15 minutes. Pressing the
switch again also turns the de-icer
off.
Operating conditions
Vehicles without a smart ...
Removal
Disconnect cable from negative battery
terminal
Caution:
Wait at least 90 seconds after disconnecting the
cable from the negative (-) battery terminal to
prevent airbag and seat belt pretensioner activation.
Remove radiator support opening cover
Remove front wheel rh
Remove no. 1 ...
Removal
Drain differential oil
Remove rear wheel
Remove tailpipe assembly
Remove the tailpipe (see page ex-2).
Remove center exhaust pipe assembly
Remove the center pipe (see page ex-2).
Remove propeller with center bearing
shaft assembly (see page pr-3)
Remove rear suspen ...
