Toyota RAV4 (XA40) 2013-2018 Service Manual: Disassembly
Caution:
Wear protective gloves. Sharp areas on the seat frame (with adjuster) may injure your hands.
- Remove reclining power seat switch knob

- Using a screwdriver, detach the knob.
Hint:
Tape the screwdriver tip before use.
- Remove slide and vertical power seat switch knob

- Using a screwdriver, detach the knob.
Hint:
Tape the screwdriver tip before use.
- Remove front seat cushion shield lh

- Disconnect the 2 rubber bands of the front seatback board from the front seat frame (with adjuster).

- Remove the 5 screws.
- Using a screwdriver, detach the 3 claws and remove the cushion shield (with front no. 1 Seat cushion inner shield).
Hint:
Tape the screwdriver tip before use.
- Disconnect the connector from the front power seat lumbar switch.

- Remove the front no. 1 Seat cushion inner shield from the cushion shield.
- Remove the screw.
- Using a screwdriver, detach the claw and remove the inner shield.
Hint:
Tape the screwdriver tip before use.
- Remove front power seat lumbar switch

- Remove the 2 screws and switch.
- Remove front seat cushion inner shield lh

- Remove the screw.
- Using a screwdriver, detach the 3 claws.
Hint:
Tape the screwdriver tip before use.
- Using a clip remover, detach the clip and remove the inner shield.
- Remove front seat inner belt assembly lh (see page sb-22)
- Remove front power seat switch
- Remove the 3 screws.
- Disconnect the connector and remove the switch.
- Remove front seat cushion cover
- W/ seat heater system: disconnect the connector.

- Using a clip remover, remove the 2 clips.
- Detach the 2 hooks on the seat cushion front side.
- Using a screwdriver, detach the hooks and remove the seat cushion cover (with pad).
Hint:
Tape the screwdriver tip before use.

- Remove the 15 hog rings and seat cushion cover from the seat cushion pad.
- Remove front seat cushion heater (w/ seat heater system)

- Cut off the 10 tack pins which fasten the seat heater, and then remove the seat cushion heater from the seat cushion cover.
Notice:
Be careful not to damage the seat cushion cover and seat heater.
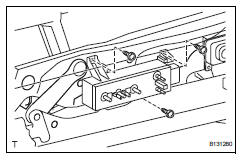
- Remove front seatback board subassembly lh

- Open the lower part of the seatback board. Then remove the 2 screws.

- Pull the seatback board in the direction indicated by
the arrow in the illustration to detach the 2 claws.
Then, remove the seatback board.
- Remove front seatback cover

- Remove the 5 hog rings.
- Using a screwdriver, detach the hooks.
Hint:
Tape the screwdriver tip before use.

- Detach the 4 claws and remove the 2 headrest supports.

- W/ front seat side airbag: remove the nut and move the 2 seatback cover brackets.
- Remove the seatback cover (with pad) from the seat frame (with adjuster).

- Remove the 11 hog rings and seatback cover from the seatback pad.
- Remove front seatback heater (w/ seat heater system)

- Cut off the 6 tack pins which fasten the seat heater, and then remove the seat cushion heater from the seat cushion cover.
Notice:
Be careful not to damage the seat cushion cover and seat heater.
- Remove reclining adjuster lower inside cover lh

- Remove the 2 screws.
- Detach the claw and remove the inside cover.
- Remove reclining adjuster lower inside cover rh
Hint:
Use the same procedures described for the lh side.
- Remove reclining adjuster upper inside cover lh

- Remove the screw and inside cover.
- Remove reclining adjuster upper inside cover rh
- Remove the screw and inside cover.
- Remove front seat cushion lower shield lh

- Remove the screw.
- Detach the hook of the lower shield and remove the lower shield.
- Remove front seat cushion lower shield rh
Hint:
Use the same procedures described for the lh side.
- Remove lumbar support adjuster assembly

- Disconnect the connector.
- Remove the 2 screws and lumbar support adjuster.
- Remove seat position airbag sensor (see page rs-390)
- Remove front seat wire
 Removal
Hint:
Use the same procedures for the rh side and lh side.
The procedures listed below are for the rh side.
Remove front seat headrest assembly
Remove front seat assembly
Opera ...
 Reassembly
Caution:
Wear protective gloves. Sharp areas on the seat frame
(with adjuster) may injure your hands.
Install front seat wire
Install seat position airbag sensor (see
page rs-390)
Install ...
Other materials:
Luggage compartment
features
Cargo hooks
Raise the hooks to use.
The cargo hooks are provided for
securing loose items.
Caution
When the cargo hooks are not in use
To avoid injury, always return the cargo hooks to their stowed
positions.
Grocery bag hooks
Notice
Grocery bag hook weight capacity
Do not hang ...
If the shift lever cannot
be shifted from p
If the shift lever cannot be shifted with your foot on the brake
pedal, there may be a problem with the shift lock system (a system
to prevent accidental operation of the shift lever). Have the
vehicle inspected by your toyota dealer immediately.
The following steps may be used as an emergency ...
Intermediate shaft speed sensor "A"
Description
This sensor detects the rotation speed of the counter gear. By comparing the
counter gear speed signal
(nc) with the direct clutch speed sensor signal (nt), the ecm detects the shift
timing of the gears and
approximately controls the engine torque and hydraulic pressure accord ...
