Toyota RAV4 (XA40) 2013-2018 Service Manual: Installation (2005/11-2006/01)
- Install sliding roof weatherstrip
- Install the sliding roof weatherstrip.
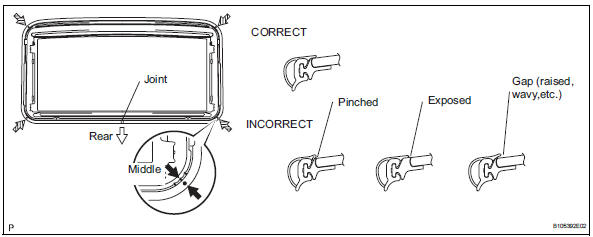
- Position the joint of the weatherstrip at the rear center.
- Align the marks on the weatherstrip with the middle marks at the corners of the plastic on the edge of the sliding roof panel and install the weatherstrip. Make sure that the marks on the weatherstrip are positioned within the area indicated by the marks at the corners of the plastic on the edge of the sliding roof panel.
- Install the lip of the weatherstrip firmly.
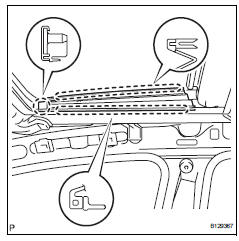
- Install sliding roof housing assembly
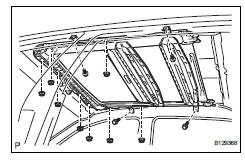
- Install the housing with the 4 bolts and 8 nuts.
Torque: 5.4 N*m (55 kgf*cm, 48 in.*Lbf)
- Connect sliding roof drain hose
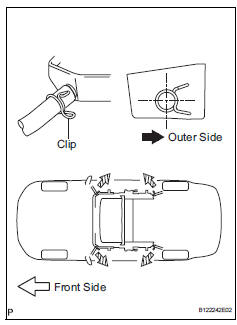
- Connect the 4 drain hoses.
Notice:
The clip must face toward the outside of the vehicle and also be above the lower surface of the sliding roof housing when installing the drain hoses.
- Install sliding roof glass sub-assembly
- Using a t25 "torx" driver, temporarily install the sliding roof glass sub-assembly with the 4 screws.
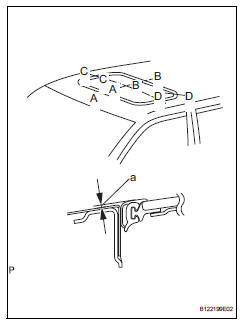
- Perform a level check.
- Check the difference in level for "a" between the roof panel and the upper surface of the weatherstrip when the sliding roof glass is fully closed.
Standard measurement 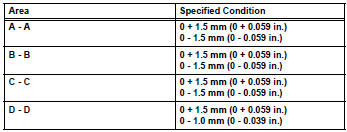
Hint:
"+" Represents the condition that the glass is above the panel level. "-" Represents the condition that the glass is below the panel level.
- Perform a gap check.
- Check the gap between the roof panel and roof glass.
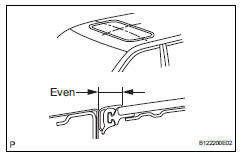
Notice:
The gap must be even all around.
- Using a t25 "torx" driver, install the sliding roof glass with the 4 screws.
Torque: 4.0 N*m (41 kgf*cm, 35 in.*Lbf)
- Install sliding roof side garnish lh
- Attach the claws to install the garnish.
- Install sliding roof side garnish rh
Hint:
Use the same procedures described for the lh side.
- Check for water leaks
- Adjust the sliding roof glass sub-assembly, and check for water leaks.
- If there are any leaks, readjust the sliding roof glass sub-assembly.
- Install roof headlining assembly
- Install the roof headlining (see page ir-49).
- Connect cable to negative battery terminal
 Reassembly
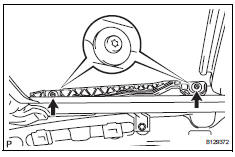
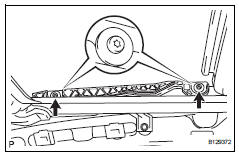
Install sliding roof drive cable
Using a screwdriver, slide the sliding roof drive
cable sub-assemblies in the direction indicated by
the arrow in the illustration to install them.
...
 Installation (2006/01- )
Install sliding roof weatherstrip
Install the sliding roof weatherstrip.
Position the joint of the weatherstrip at the rear
center.
Align the marks on the weatherstrip with the
...
Other materials:
Winter driving tips
Carry out the necessary
preparations and inspections
before driving the
vehicle in winter. Always
drive the vehicle in a manner
appropriate to the prevailing
weather conditions.
Pre-winter preparations
Use fluids that are appropriate
to the prevailing outside temperatures.
Engine oil
Engine c ...
Rear window and outside rear view mirror defoggers
These features are used to defog the rear window, and to
remove raindrops, dew and frost from the outside rear view mirrors
(if equipped).
Vehicles with a manual air conditioning system
On/off
The defoggers will automatically
turn off after approximately 15 minutes.
Vehicles with an au ...
Removal
Discharge fuel system pressure (see page
fu-9)
Drain coolant (see page co-6)
Disconnect cable from negative battery
terminal
Caution:
Wait at least 90 seconds after disconnecting the
cable from the negative (-) battery terminal to
prevent airbag and seat belt pretensioner activation ...
