Toyota RAV4 (XA50) 2019-2026 Owners Manual: Front seats
The seats can be adjusted (longitudinally, vertically, etc.). Adjust the seat to ensure the correct driving posture.
Adjustment procedure
Manual seat
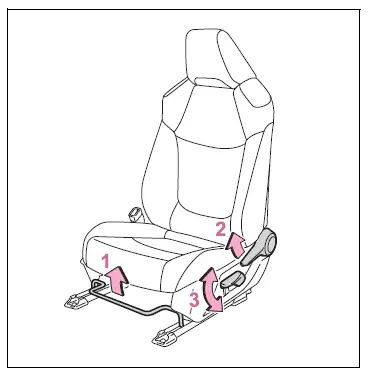
- Seat position adjustment lever
- Seatback angle adjustment lever
- Vertical height adjustment lever (driver's side only)
Power seat
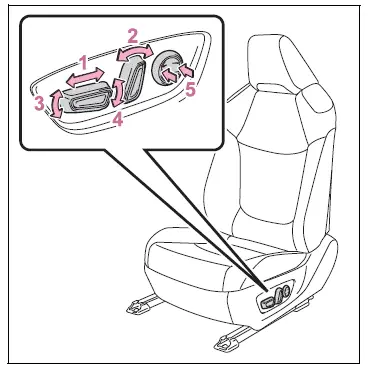
- Seat position adjustment switch
- Seatback angle adjustment switch
- Seat cushion (front) angle adjustment switch
- Vertical height adjustment switch
- Lumbar support adjustment switch (driver's side only)
â– When adjusting the seat
Take care when adjusting the seat so that the head restraint does not touch the ceiling and sun visor.
WARNING
â– When adjusting the seat position
- Take care when adjusting the seat position to ensure that other passengers are not injured by the moving seat.
- Do not put your hands under the
seat or near the moving parts to
avoid injury.
Fingers or hands may become jammed in the seat mechanism.
- Make sure to leave enough space around the feet so they do not get stuck.
- Manual seat only: After adjusting the seat, make sure that the seat is locked in position.
â– Seat adjustment
To reduce the risk of sliding under the lap belt during a collision, do not recline the seat more than necessary.
If the seat is too reclined, the lap belt may slide past the hips and apply restraint forces directly to the abdomen, or your neck may contact the shoulder belt, increasing the risk of death or serious injury in the event of an accident.
Adjustments should not be made while driving as the seat may unexpectedly move and cause the driver to lose control of the vehicle.

 Rear seats
Reclining adjustments and
folding the seatbacks can
be done with lever operation.
Adjustment procedure
Pull the seatback angle adjustment
lever A, and adjust the
seatback angle.
WARNING
â– When opera ...
Other materials:
Compressor circuit
Description
When the a/c switch is turned on, the magnetic clutch on signal is sent from
the air conditioning
amplifier. Then the mg clt relay turns on to operate the magnetic clutch.
Wiring diagram
Inspection procedure
Inspection procedure
Perform active test by intelligent tester (a ...
Rear occupant classification sensor lh circuit malfunction
Description
The rear occupant classification sensor lh circuit consists of the occupant
classification ecu and the rear
occupant classification sensor lh.
Dtc b1782 is recorded when a malfunction is detected in the rear occupant
classification sensor lh
circuit.
Wiring diagram
...
Axle system
Problem symptoms table
Hint:
Use the table below to help determine the cause of the
problem symptom. The potential causes of the symptoms are
listed in order of probability in the "suspected area" column of
the table. Check each symptom by checking the suspected
areas in the order th ...
