Toyota RAV4 (XA40) 2013-2018 Service Manual: Front passenger side seat belt warning light malfunction
Description
When the ignition switch is on, the center airbag sensor transmits front seat inner belt status signals to the combination meter through the can bus line. If the front passenger seat belt is not fastened, the heater control panel (automatic a/c) or clock (manual a/c) blinks the front passenger seat belt warning light. If the seat belt is fastened, the warning light goes off.
Notice:
The seat belt warning system uses the can bus line. Before troubleshooting the seat belt warning system, perform "communication function check" by following "how to proceed with troubleshooting" to confirm that the communication systems are normal.
Wiring diagram

Inspection procedure
- Perform active test by intelligent tester
- Select the active test, use the intelligent tester to generate a control command, and then check that the seat belt warning light operates.
Center airbag sensor:
![]()
Ok: passenger side seat belt warning light operates normally.


- Check a/c type
- Check system.


- Check heater control panel (power source circuit)

- Disconnect the e23 panel connector.
- Measure the voltage and resistance of the wire harness side connector.
Standard voltage 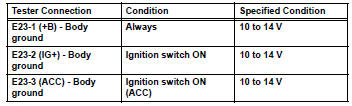
Standard resistance 


- Check wire harness (heater control panel - combination meter assembly)
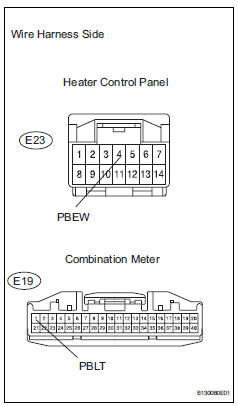
- Disconnect the e23 panel connector.
- Disconnect the e19 meter connector.
- Measure the resistance of the wire harness side connectors.
Standard resistance 


- Inspect heater control panel
- Remove the heater control panel.
- Apply battery voltage and check that the front passenger side seat belt warning light illuminates.
Ok 

Hint:
When the battery's negative (-) lead is applied to terminal 4 and the positive (+) lead is applied to terminal 7, the seat belt warning light does not illuminate.


- Check clock sub-assembly (power source circuit)

- Disconnect the e22 clock connector.
- Measure the voltage and resistance of the wire harness side connector.
Standard voltage
Standard resistance


- Check wire harness (clock - combination meter)

- Disconnect the e22 clock connector.
- Disconnect the e19 meter connector.
- Measure the resistance of the wire harness side connectors.
Standard resistance 


- Inspect clock sub-assembly

- Remove the clock.
- Apply battery voltage and check that the front passenger side seat belt warning light illuminates.
Ok 
Hint:
When the battery's negative (-) lead is applied to terminal 3 and the positive (+) lead is applied to terminal 5, the seat belt warning light does not illuminate.


Replace combination meter assembly
 Driver side seat belt warning light does not operate
Description
When the ignition switch is on, the center airbag sensor transmits front seat
inner belt status signals to
the combination meter through the can bus line. If the driver seat belt is no ...
 Front seat inner belt assembly
Components
...
Other materials:
Hood
Release the lock from the inside of the vehicle to open the hood
Pull the hood lock release lever.
The hood will pop up slightly.
Push the auxiliary catch lever to
the left and lift the hood.
Hold the hood open by inserting
the supporting rod into the slot.
Cautio ...
Windshield wiper de-icer
This feature is used to prevent ice from building up on the windshield
and wiper blades.
On/off
The windshield wiper de-icer will
automatically turn off after approximately
15 minutes. Pressing the
switch again also turns the de-icer
off.
Operating conditions
Vehicles without a smart ...
Open in pump motor circuit
Description
The motor relay drives the pump motor based on a signal from the skid control
ecu.
Wiring diagram
Refer to dtc c0273/13, c0274/14, c1361/91 (see page bc-79).
Inspection procedure
Perform active test by intelligent tester (motor relay)
Select the active test, gener ...
