Toyota RAV4 (XA40) 2013-2018 Service Manual: Door control receiver
Components


Removal
- Remove rear door scuff plate rh

- Using a screwdriver, detach the 9 claws.
Hint:
Tape the screwdriver tip before use.
- Using a clip remover, detach the 2 clips and remove the garnish.
- Remove rear door opening trim weatherstrip rh
- Remove rear floor no. 1 Board (w/o rear no.
2 Seat)
- Remove deck board assembly (w/o rear no. 2 Seat)
- Remove no. 2 Seat hinge cover lh (w/ rear no.
2 Seat) (see page se-109)
- Remove no. 2 Seat hinge cover rh (w/ rear no.
2 Seat)
Hint:
Use the same procedures described for the lh side.
- Remove no. 2 Seat leg cover lh (w/ rear no. 2 Seat) (see page se-109)
- Remove no. 2 Seat leg cover rh (w/ rear no. 2 Seat)
Hint:
Use the same procedures described for the lh side.
- Remove rear no. 2 Seat assembly lh (w/ rear no. 2 Seat) (see page se-110)
- Remove rear no. 2 Seat assembly rh (w/ rear no. 2 Seat)
- Remove rear floor no. 3 Board
- Remove rear floor no. 2 Board
- Remove rear floor no. 1 Mat support side plate (see page ir-31)
- Remove rear floor finish plate (see page ir- 31)
- Remove rear deck trim cover rh (w/ rear no.
2 Seat)
- Remove the bolt.
- Using a screwdriver, detach the 4 claws and remove the trim cover.
Hint:
Tape the screwdriver tip before use.
- Remove reclining remote control lever bezel rh (w/o rear no. 2 Seat) (see page se-80)
- Remove tether anchor bracket subassembly (w/o rear no. 2 Seat)
- Remove the bolt and tether anchor bracket.

- Remove deck trim side panel assembly rh (w/o rear no. 2 Seat) (see page ir-33)
- Remove deck trim side panel assembly rh (w/ rear no. 2 Seat) (see page ir-34)
- Remove inner roof side garnish assembly rh (w/o rear no. 2 Seat)

- Using a clip remover, detach the 7 clips and remove the garnish.
- Remove inner roof side garnish assembly rh (w/ rear no. 2 Seat)

- Disconnect the rear no. 2 Seat outer belt's shoulder anchor.
- Using a screwdriver, detach the 2 claws and open the seat belt anchor cover.
Hint:
Tape the screwdriver tip before use.
- Remove the bolt and disconnect the shoulder anchor.

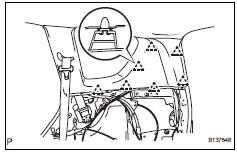
- Using a clip remover, detach the 7 clips and remove the garnish.
- Remove door control receiver

- Disconnect the receiver connector.
- Remove the bolt and receiver.
Installation
- Install door control receiver

- Install the receiver with the bolt.
- Connect the receiver connector.
- Install inner roof side garnish assembly rh (w/o rear no. 2 Seat)
- Attach the 7 clips to install the garnish.
- Install inner roof side garnish assembly Rh (w/ rear no. 2 Seat)

- Attach the 7 slips to install the garnish.
- Connect the rear no. 2 Seat belt's shoulder anchor.
- Connect the shoulder anchor with the bolt.
Torque: 42 n*m (428 kgf*cm, 31 ft.*Lbf)
- Attach the claws to close the seat belt anchor cover.

- Install deck trim side panel assembly rh (w/o rear no. Seat) (see page ir-53)
- Install deck trim side panel assembly rh (w/ rear no. 2 Seat) (see page ir-54)

- Install tether anchor bracket subassembly (w/o rear no. 2 Seat)
- Install the tether anchor bracket with the bolt.
- Install reclining remote control lever bezel rh (w/o rear no. 2 Seat) (see page se-105)
- Install rear deck trim cover rh (w/ rear no.
2 Seat)
- Attach the 4 claws to install the trim cover.
- Install the belt.
- Install rear floor finish plate (see page ir- 55)
- Install rear floor no. 1 Mat support side plate (see page ir-55)
- Install rear floor no. 3 Board
- Install rear floor no. 2 Board
- Install rear no. 2 Seat assembly lh (w/ rear no. 2 Seat) (see page se-121)
- Install rear no. 2 Seat assembly rh (w/ rear no. 2 Seat)
Hint:
Use the same procedures described for the lh side.
- Install no. 2 Seat leg cover lh (w/ rear no. 2 Seat) (see page se-123)
- Install no. 2 Seat leg cover rh (w/ rear no. 2 Seat)
Hint:
Use the same procedures described for the lh side.
- Install no. 2 Seat hinge cover lh (w/ rear no.
2 Seat) (see page se-123)
- Install no. 2 Seat hinge cover rh (w/ rear no.
2 Seat)
Hint:
Use the same procedures described for the lh side.
- Install deck board assembly (w/o rear no. 2 Seat)
- Install rear floor no. 1 Board (w/o rear no.
2 Seat)
- Install rear door opening trim weatherstrip rh
- Install rear door scuff plate rh

- Attach the 9 claws and 2 clips to install the scuff plate.
 Back door lock
Inspection
Inspect back door with motor lock assembly
Apply the battery voltage to the door lock motor and
check the operation of the door lock motor.
Ok
If the result is not as sp ...

Other materials:
How to proceed with troubleshooting
Hint:
Use these procedures to troubleshoot the key reminder
warning system.
*: Use the intelligent tester.
Vehicle brought to workshop
Inspect battery voltage
Standard voltage:
11 to 14 v
Hint:
If the voltage is below 11 v, recharge or replace the battery
before proceedi ...
Disassembly (2006/01- )
Remove front axle inboard joint boot no. 2 Clamp
One touch type:
using a screwdriver, remove the inboard joint boot
clamp, as shown in the illustration.
Claw engagement type:
using needle-nose pliers, remove the inboard joint
boot clamp, as shown in the illustration.
Rem ...
Precaution
Caution:
Replace the faulty parts of the seat belt systems (outer
belt, inner belt, bolts, nuts, adjustable shoulder anchor,
tether anchor hardware and other related parts). When
inspecting a vehicle that was in a collision, be sure to
check all of the seat belt systems regardless of whethe ...