Toyota RAV4 (XA40) 2013-2018 Service Manual: Suspension & axle front shock absorber with coil spring (for sport package)
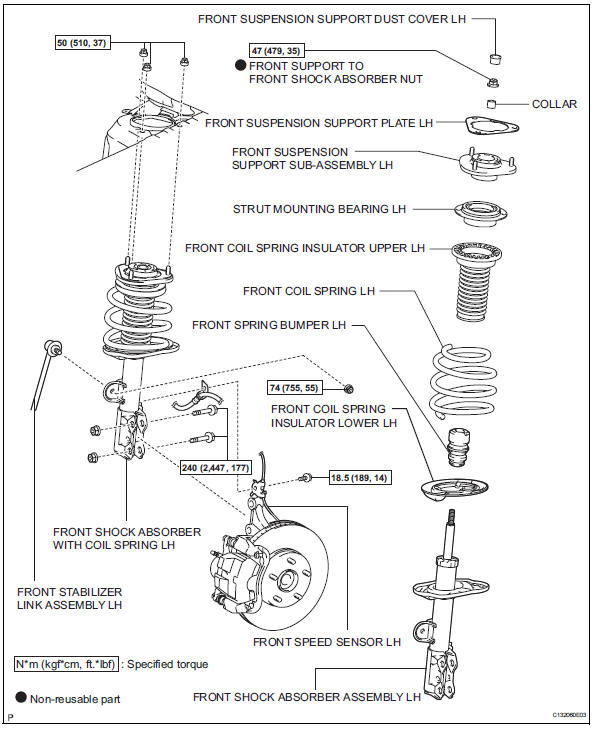
Components
Removal
Hint:
- Use the same procedures for the rh side and lh side.
- The procedures listed below are for the lh side.
- Remove front wheel
- Remove front speed sensor lh (see page bc- 191)
- Remove front stabilizer link assembly lh (see page sp-30)
- Remove front shock absorber with coil spring lh
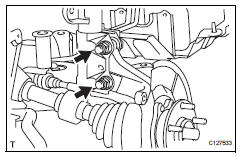
- Remove the 2 bolts and 2 nuts, and disconnect the shock absorber from the steering knuckle.
Hint:
While fixing the nuts in place, loosen and remove the bolts.
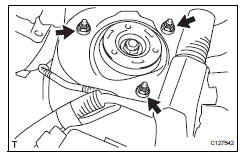
- Remove the 3 nuts and shock absorber with coil spring.
Disassembly
Hint:
- Use the same procedures for the rh side and lh side.
- The procedures listed below are for the lh side.
- Remove front suspension support plate lh
- Remove the plate from the shock absorber.
- Remove front suspension support dust cover lh
- Using a screwdriver, remove the dust cover from the suspension support.
Hint:
Tape the screwdriver tip before use.
- Remove front support to front shock absorber nut

- Install 2 nuts and 2 bolts to the bracket at the lower portion of the shock absorber and secure it with a vise.
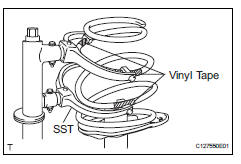
- Using sst, compress the coil spring.
Sst 09727-30021 (09727-00010, 09727-00021, 09727-00031)
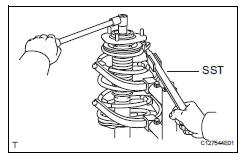
Hint:
To prevent the coil spring from being damaged, wind vinyl tape on the coil spring.
Notice:
- When holding the shock absorber with the coil spring removed, do not hold it by the spring lower seat. Also, do not knock the spring lower seat.
- Do not use an impact wrench which will damage sst.
- Using sst to hold the suspension support, remove the nut.
Sst 09729-22031
- Remove collar
- Remove the collar from the suspension support.
- Remove front suspension support subassembly lh
- Remove the suspension support from the shock absorber.
- Remove strut mounting bearing lh
- Remove the mounting bearing from the suspension support.
Notice:
- When removing the bearing, the suspension support may become stuck. Use a screwdriver or equivalent to remove the bearing.
- Make sure not to use excessive force when removing the bearing as it may come apart.
- Remove front coil spring insulator upper lh
- Remove the insulator upper from the shock absorber.
- Remove front spring bumper lh
- Remove the spring bumper from the shock absorber.
- Remove front coil spring lh
- Remove the coil spring from the shock absorber.
- Remove sst from the coil spring.
- Remove front coil spring insulator lower lh
- Remove the insulator lower from the shock absorber.
Inspection
- Inspect front shock absorber assembly lh
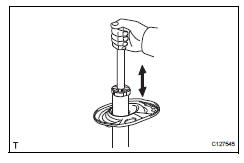
- Compress and extend the shock absorber rod 4
times or more. Check that there is no abnormal
resistance or unusual sound during the operation.
If there is any abnormality, replace the shock absorber assembly with a new one.
Notice:
When disposing of the shock absorber, see disposal (see page sp-19).
Reassembly
Hint:
- Use the same procedures for the rh side and lh side.
- The procedures listed below are for the lh side.
- Install front coil spring insulator lower lh
- Install the insulator lower to the shock absorber.
- Install front spring bumper lh
- Install the spring bumper to the shock absorber.
- Install front coil spring lh
- Using sst, compress the coil spring.
Sst 09727-30021 (09727-00010, 09727-00021, 09727-00031)
Hint:
To prevent the coil spring from being damaged, wind vinyl tape around the coil spring.
Notice:
Do not use an impact wrench which will damage sst.
- Install the coil spring to the shock absorber.
Hint:
Fit the lower end of the coil spring to the gap of the lower spring seat.
- Install front coil spring insulator upper lh
- Install the insulator upper to the shock absorber.
- Install strut mounting bearing lh
- Install the mounting bearing to the insulator upper.
- Install collar
- Install the collar to the suspension support side.
- Install front suspension support subassembly lh
- Install the suspension support to the shock absorber.
- Remove front support to front shock absorber nut
- Using sst to hold the spring upper seat, install a new nut.
Sst 09729-22031
- Remove sst.
Sst 09727-30021 (09727-00021, 09727-00031)
Notice:
When removing sst, make sure that the suspension support is not in an inclined position, as the bearing may come apart.
- Install front suspension support dust cover lh
- Install the dust cover to the shock absorber.
- Install front suspension support plate lh
- Install the support plate to the shock absorber with coil spring.
 Front shock absorber with coil spring
Components
Removal
Hint:
Use the same procedures for the rh side and lh side.
The procedures listed below are for the lh side.
Remove front wheel
Disconnect front speed sensor lh
...
 Front suspension lower no. 1 Arm
Components
Removal
Remove front wheel
Remove hood sub-assembly
Remove the hood (see page ed-4).
Suspend engine assembly
Install the no. 1 And no. 2 Engine hangers with the ...
Other materials:
Seat heater system
Parts location
System diagram
Problem symptoms table
Hint:
Use the table below to help determine the cause of the
problem symptom. The potential causes of the symptoms are
listed in order of probability in the "suspected area" column
of the table. Check each symptom by check ...
Solar sensor circuit (driver side)
Description
The solar sensor, which is installed on the upper side of the instrument
panel, detects sunlight and
controls the air conditioning auto mode. The output voltage from the solar
sensor varies in accordance
with the amount of sunlight. When the sunlight increases, the output volt ...
Inspection
Inspect starter assembly
Notice:
These tests must be performed within 3 to 5 seconds
to avoid burning out the coil.
Perform the pull-in test.
Disconnect the lead wire from terminal c.
Connect the battery to the magnetic switch as
shown in the illustration. Check that the clutch ...
