Toyota RAV4 (XA40) 2013-2018 Service Manual: Steering column assembly
Components


Removal
Caution:
Some of these service operations affect the srs airbag system. Read the precautionary notices concerning the srs airbag system before servicing the steering column (see page rs-1).
- Place front wheels facing straight ahead
- Disconnect cable from negative battery terminal
Caution:
Wait at least 90 seconds after disconnecting the cable from the negative (-) battery terminal to prevent airbag and seat belt pretensioner activation.
- Remove steering pad (see page rs-336)
- Remove steering wheel assembly

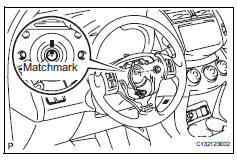
- Remove the nut and place matchmarks on the steering wheel and steering column.

- Using sst, remove the steering wheel.
Sst 09950-50013 (09951-05010, 09952-05010, 09953-05020, 09954-05021)
Notice:
Apply a small amount of grease to the threads and tip of sst (center bolt) before use.
- Remove steering column cover

- Detach the 4 claws, release the tilt lever and remove the lower steering column cover.

- Detach the claw and remove the upper steering column cover.
- Remove spiral cable sub-assembly

- Disconnect all connectors from the turn signal switch with spiral cable.
- Remove combination switch assembly

- Detach the clamp shown in the illustration and remove the combination switch from the steering column.
- Remove instrument panel sub-assembly
- Remove the instrument panel (see page ip-4).
- Disconnect power steering ecu

- Detach the power steering motor wire harness and torque sensor wire harness clamps from the power steering ecu side.
- Disconnect the 2 steering column connectors from the power steering ecu.
- Remove lower instrument panel finish panel (see page ip-20)
- Remove column hole cover silencer sheet

- Turn back the floor carpet, remove the 2 clips and remove the column hole cover silencer sheet.
- Remove no. 2 Steering intermediate shaft assembly

- Place matchmarks on the steering intermediate shaft and steering gear
- Remove bolt a and detach the steering assembly from the steering gear.
- Place matchmarks on the steering intermediate shaft and steering column.
- Remove bolt b and detach the steering intermediate shaft shaft from the steering column.
- Remove brake pedal support assembly
- Remove the brake pedal support (see page br-12).
- Remove steering column assembly

- Disconnect all connectors and detach all wire harness clamps from the steering column.
- Remove the bolt and 2 nuts and remove the steering column from the instrument panel reinforcement.
Disassembly
- Remove transponder key amplifier

- Detach the 2 claws and slide the transponder key amplifier in the direction shown in the illustration, to detach it from the steering column upper with switch bracket.
- Remove steering column upper with switch bracket assembly
- Fix the steering post in a vise between aluminum plates.
Notice:
Do not overtighten the vise.
- Using a drill, drill a hole in each of the steering lock set bolt to insert a screw extractor.
- Using a screw extractor, remove the steering lock set bolt and remove the steering column upper with switch bracket and steering column clamp upper.
- Remove ignition switch lock cylinder assembly

- Turn the ignition switch to on (acc).

- Insert the tip of a screwdriver into the hole in the steering column bracket upper, as shown in the illustration, and pull the ignition switch lock cylinder out until its claw comes into contact with the stopper of the steering column bracket upper.
Notice:
Pull the ignition switch lock cylinder assembly out until its claw comes into contact with the stopper of the steering column bracket assembly upper. Otherwise, the following procedure cannot be conducted properly.

- Insert the tip of a screwdriver into the hole in the steering column bracket and tilt it downward, as shown in the illustration, to disengage the claw of the ignition switch lock cylinder. Then pull out the ignition switch lock cylinder.
- Remove unlock warning switch assembly

- push up the unlock warning switch center portion to disengage the 2 claws.
Hint:
Slide the unlock warning switch in the direction shown by the arrow in the illustration to remove it.
- Remove key interlock solenoid

- For automatic transaxle:
- Remove the 2 screws and remove the key interlock solenoid from the steering column bracket upper.
- Remove ignition or starter switch assembly

- Detach the 2 claws and remove the ignition (starter) switch from the steering column bracket upper.
Inspection
- Check torque sensor
- Check the torque sensor (see page ps-19).
- Check power steering motor
- Check the power steering motor (see page ps-22).
- Check motor rotation angle sensor
- Check the motor rotation angle sensor (see page ps-25).
Reassembly
- Install ignition or starter switch assembly

- Attach the 2 claws to install the ignition switch onto the steering column bracket upper.
- Install key interlock solenoid

- For automatic transaxle:
- Install the key interlock solenoid onto the steering column bracket upper with the 2 screws.
- Install unlock warning switch assembly

- Attach the 2 claws to install the unlock warning switch onto the steering column bracket upper.
Hint:
Slide the unlock warning switch in the direction shown by the arrow in the illustration to install it.
- Install ignition switch lock cylinder assembly

- Turn the ignition switch to on (acc).
- Install the ignition switch lock cylinder into the steering column bracket upper.
- Make sure that the ignition switch lock cylinder is securely fixed onto the ignition switch lock cylinder.
- Inspect steering lock operation

- Remove the key and check that the steering lock function is activated.

- Insert the key, turn the ignition switch on (acc) and check that the steering lock function is deactivated.
- Install steering column upper w/ switch bracket assembly
- Fix the steering column assembly in a vise between aluminum plates.
Notice:
Do not overtighten the vise.

- Install the steering column upper with switch bracket and steering column clamp upper with new steering lock set bolt, and then tighten the bolts until their heads come off.
- Install transponder key amplifier

- Attach the 2 claws and install the transponder key amplifier onto the steering column upper with the switch bracket.
Installation
- Install steering column assembly

- Install the steering column onto the instrument panel
reinforcement with the 3 bolts.
Torque: 25 n*m (255 kgf*cm, 18 ft.*Lbf)
- Connect all the connectors and clamp the wire harnesses onto the steering column bracket.
- Install brake pedal support assembly
- Install the brake pedal support (see page br-16).
- Install no.2 Steering intermediate shaft assembly

- Align the matchmarks on steering intermediate shaft
and the steering sliding yoke and temporarily install
them with bolt b.
Torque: 35 n*m (360 kgf*cm, 26 ft.*Lbf)
- Align the matchmarks on the steering sliding yoke
and steering gear and install them with bolt a.
Torque: 35 n*m (360 kgf*cm, 26 ft.*Lbf)
- Install column hole cover silencer sheet
- Install the column hole cover plate with the 2 clips.
- Install the floor carpet.
- Install lower instrument panel finish panel (see page ip-25)

- Connect power steering ecu

- Connect the 2 steering column connectors to the power steering ecu.
- Install the power steering motor wire harness and torque sensor wire harness clamps onto the side of the power steering ecu.
- Tilt the steering column assembly up and down to make sure that the power steering motor wire harness and torque sensor wire harness do not interfere with any components.
- Install instrument panel sub-assembly
- Install the instrument panel (see page ip-9).
- Install combination switch assembly

- Install the turn signal switch onto the steering column with the clamp.
- Install spiral cable sub-assembly
- Install the spiral cable onto the turn signal switch.

- Connect all the connectors to the turn signal switch with spiral cable.
- Install steering column cover

- Attach the claw to install the upper steering column cover.

- Attach the 4 claws to install the lower steering column cover.
- Install steering wheel assembly
- Align the matchmarks and install the steering wheel onto the steering column.
- Install the nut.
Torque: 50 n*m (510 kgf*cm, 37 ft.*Lbf)
- Connect all the connectors to the spiral cable.
- Install steering pad (see page rs-336)
- Position front wheels facing straight ahead
- Connect cable to negative battery terminal
- Inspect srs warning light
- Inspect the srs warning light (see page rs-52).
 Problem symptoms table (2006/01- )
Hint:
Use the table below to help determine the cause of the
problem symptom. The potential causes of the symptoms are
listed in order of probability in the "suspected area" column
of th ...
 Wiper and washer
...
Other materials:
Occupant classification ecu malfunction
Description
Dtc b1795 is recorded when a malfunction is detected in the occupant
classification ecu.
Troubleshoot dtc b1771 first when dtc b1771 and b1795 are output simultaneously.
Wiring diagram
Inspection procedure
Check for dtc
Turn the ignition switch on, and wait ...
Unlocking and locking the doors
Front doors
Grip the driver’s door handle to
unlock the door. Grip the passenger’s
door handle to unlock all the
doors.*
Make sure to touch the sensor on
the back of the handle.
The doors cannot be unlocked for
3 seconds after the doors are
locked.
*: The door unlock settings can be ...
Luggage room light
Components
Removal
Disconnect cable from negative battery
terminal
Caution:
Wait at least 90 seconds after disconnecting the
cable from the negative (-) battery terminal to
prevent airbag and seat belt pretensioner activation.
Remove back door center garnish (see page
ed-59)
...
