Toyota RAV4 (XA40) 2013-2018 Service Manual: Front power seat control system
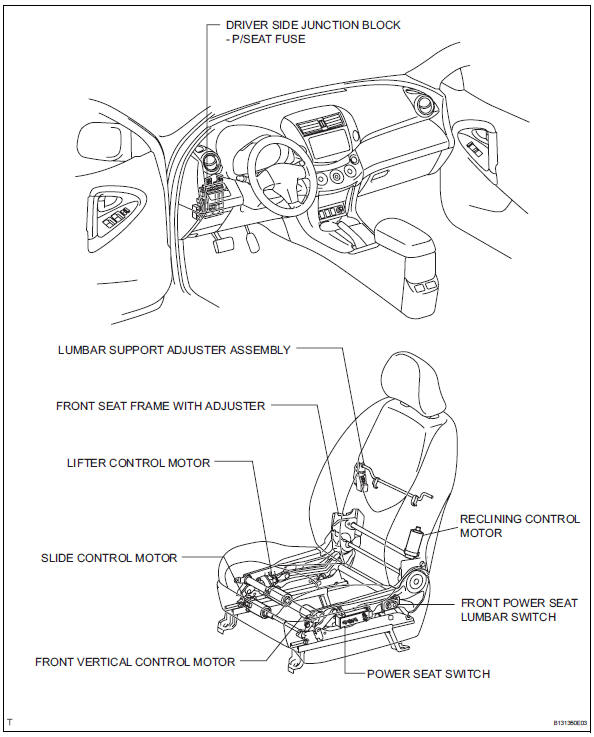
Parts location
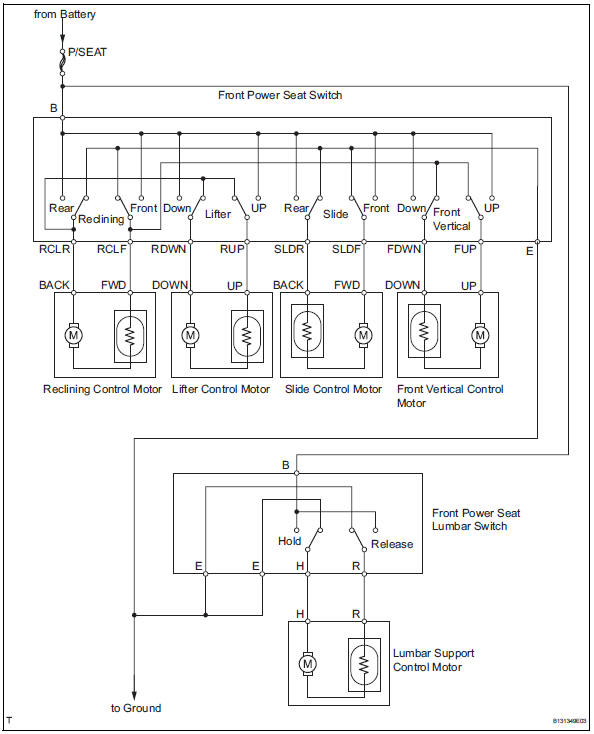
System diagram
Problem symptoms table
Hint:
Use the table below to help determine the cause of the problem symptom. The potential causes of the symptoms are listed in order of probability in the "suspected area" column of the table. Check each symptom by checking the suspected areas in the order they are listed. Replace parts as necessary.

On-vehicle inspection
- Check power seat function
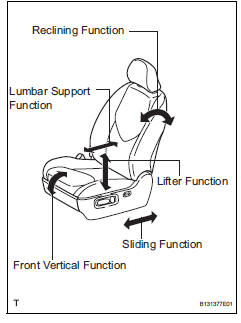
- Check the basic functions.
- Operate the power seat switches and check to make sure each seat function works:
- Sliding
- Front vertical
- Lifter
- Reclining
- Lumbar support
- Check front seat frame with adjuster (sliding, front vertical, lifter and reclining functions)
- Check the ptc operation inside the power seat motor.
Hint:
The ptc thermistor's resistance increases when the power seat switch is held down even after the power seat has been moved to the maximum in one direction. If the resistance increases beyond a specified level, current is cut to prevent a short circuit.
Notice:
- The inspection should be performed with the seat installed in the vehicle.
- Perform the 4 steps below for the full range of motion for each power seat function.
- Choose a power seat function. Operate the power seat switch and move the seat as much as possible in one direction. Keep the seat in that position for approximately 60 seconds.
- Operate the power seat switch again and continue to try to move the seat in the same direction as in the previous step. Measure the amount of time elapsed before current is automatically cut (the sound of the motor has stopped).
Standard: 4 to 90 seconds
- After current has been cut, release the power seat switch and wait for approximately 60 seconds.
- Operate the same power seat switch and move the seat in the opposite direction. Check that the motor operates.
- Check lumbar support adjuster assembly
- Check the ptc operation inside the power seat motor.
Notice:
The inspection should be performed with the seat installed in the vehicle.
- Operate the lumbar support switch and move the lumbar support to either the foremost or rearmost position. Keep the seat in that position for approximately 60 seconds.
- Operate the lumbar support switch again and
continue to try to move the lumbar support in
the same direction as in the previous step.
Measure the amount of time elapsed before current is automatically cut (the sound of the motor has stopped).
Standard: 4 to 90 seconds
- After current has been cut, release the lumbar support switch and wait for approximately 60 seconds.
- Operate the lumbar support switch and move the seat in the opposite direction. Check that the motor operates.
 Seat
Seat
...
 Seat heater system
Parts location
System diagram
Problem symptoms table
Hint:
Use the table below to help determine the cause of the
problem symptom. The potential causes of the symptoms are
listed in orde ...
Other materials:
If a warning light turns on or
a warning buzzer sounds
Calmly perform the following actions if any of the warning
lights comes on or flashes. If a light comes on or flashes, but
then goes off, this does not necessarily indicate a malfunction
in the system. However, if this continues to occur, have
the vehicle inspected by your Toyota dealer.
Actions to ...
Installation
Install no. 2 Chain sub-assembly
Set the crankshaft key in the left horizontal position.
Turn the cutout of the drive shaft so that it faces
upward.
Align the yellow mark links with the timing marks of
each gear as shown in the illustration.
Install the sprockets onto ...
The keys
The following keys are provided with the vehicle.
Vehicles without a smart key system (type a)
Master keys
Operating the wireless remote control
function
Valet key
Key number plate
Vehicles without a smart key system (type b)
Master keys
Operating the wireless r ...
