Toyota RAV4 (XA40) 2013-2018 Service Manual: Removal (2006/01- )
- Disconnect cable from negative battery terminal
Caution:
Wait at least 90 seconds after disconnecting the cable from the negative (-) battery terminal to prevent airbag and seat belt pretensioner activation.
- Remove air cleaner case sub-assembly (for 2az-fe)
- Remove the air cleaner case (see page em-98).
Hint:
Refer to the procedures from the removal of the purge vsv up until the removal of the air cleaner case.
- Remove air cleaner case (for 2gr-fe)
- Remove the air cleaner case (see page em-21).
Hint:
Refer to the procedures from the removal of the air cleaner cap sub-assembly up until the removal of the air cleaner case.
- Drain brake fluid
Notice:
Wash off brake fluid immediately if it comes in contact with any painted surface.
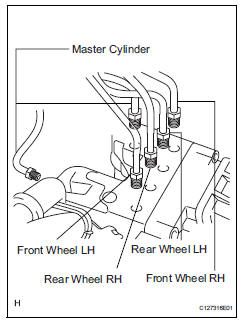
- Disconnect brake lines
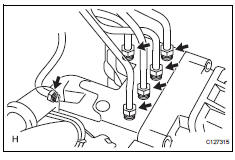
- Using sst, disconnect the 6 brake lines from the actuator.
Sst 09023-00101
- Place tags or marks to identify the installation locations of each brake line.
- Remove abs and traction actuator assembly with bracket
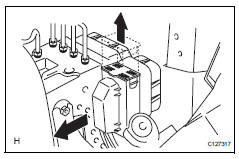
- Pull the lock lever upward and disconnect the connector.
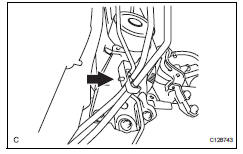
- Disconnect the brake tube clamp from the bracket.
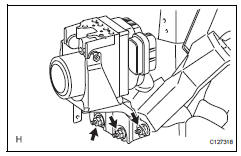
- Remove the 3 nuts and actuator with bracket.
Notice:
Be careful not to damage the brake tubes.
Disassembly
- Remove abs and traction actuator assembly
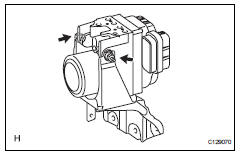
- Remove the 2 nuts and actuator from the bracket.
- Remove brake actuator bolt holder
- Remove the 2 bolt holders from the actuator.
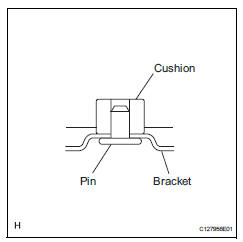
- Remove brake actuator bolt cushion
- Remove the 3 cushions from the actuator.
Reassembly
- Install brake actuator bolt cushion
- Install the 3 cushions to the actuator.
- Install brake actuator bolt holder
- Install the 2 bolt holders to the actuator.
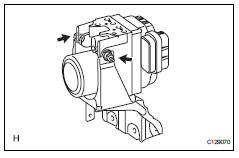
- Install abs and traction actuator assembly
Notice:
- Do not remove the hole plug before connecting the brake tube. New actuators are filled with brake fluid.
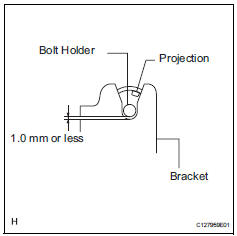
- The clearance between the bolt holder and bracket is less than 1.0 Mm (0.039 In.).
- The projection should be set as shown in the illustration.
- Install the 2 nuts to assemble the actuator and bracket.
Torque: 5.4 N*m (55 kgf*cm, 48 in.*Lbf)
 Removal (2005/11-2006/01)
Disconnect cable from negative battery
terminal
Caution:
Wait at least 90 seconds after disconnecting the
cable from the negative (-) battery terminal to
prevent airbag and seat belt prete ...
 Installation (2005/11-2006/01)
Install abs and traction actuator assembly with bracket
Notice:
Do not remove the hole plug before connecting the
brake tube. New actuators are filled with brake fluid.
Install the actuato ...
Other materials:
Parts location
System diagram
The configuration of the electronic control system in the
u140f automatic transaxle is as shown in the following chart.
System description
System description
The electronic controlled automatic transaxle
(ect) is an automatic transaxle that elect ...
Inside vehicle
General maintenance
Performing the following maintenance checks on the vehicle
is the owner's responsibility. The owner may perform the
maintenance or take the vehicle to a service center. Check
the parts of the vehicle described below on a daily basis. In
most cases, special tools are not requ ...
Tire pressure warning light circuit
Description
If the tire pressure warning ecu detects trouble, the tire pressure warning
light turns on and tire pressure
monitor is canceled at the same time. At this time, the ecu records a dtc in
memory.
Connect terminals tc and cg of the dlc3 to make the tire pressure warning light
bli ...
