Toyota RAV4 (XA40) 2013-2018 Service Manual: Removal
- Disconnect cable from negative battery terminal
Caution:
Wait at least 90 seconds after disconnecting the cable from the negative (-) battery terminal to prevent airbag and seat belt pretensioner activation.
- Remove rear door scuff plate rh (see page ir-29)
- Remove package tray trim pocket subassembly (w/o rear no. 2 Seat)
- Remove tonneau cover assembly (w/o rear no. 2 Seat)
- Remove rear floor no. 1 Board (w/o rear no.
2 Seat)
- Remove deck board assembly (w/o rear no. 2 Seat)
- Remove no. 2 Seat hinge cover lh (w/ rear no.
2 Seat) (see page se-109)
- Remove no. 2 Seat hinge cover rh (w/ rear no.
2 Seat) (see page ir-30)
- Remove no. 2 Seat leg cover lh (w/ rear no. 2 Seat) (see page se-109)
- Remove no. 2 Seat leg cover rh (w/ rear no. 2 Seat) (see page ir-30)
- Remove rear no. 2 Seat assembly lh (w/ rear no. 2 Seat) (see page se-110)
- Remove rear no. 2 Seat assembly rh (w/ rear no. 2 Seat) (see page ir-30)
- Remove rear floor no. 3 Board
- Remove rear floor no. 2 Board
- Remove rear floor no. 1 Mat support side plate (see page ir-31)
- Remove rear floor finish plate (see page ir- 31)
- Remove rear deck trim cover rh (w/ rear no.
2 Seat) (see page ir-31)
- Remove reclining remote control lever bezel rh (w/o rear no. 2 Seat) (see page se-80)
- Remove tether anchor bracket subassembly (w/o rear no. 2 Seat) (see page ir-32)
- Remove deck trim side panel assembly rh (w/o rear no. 2 Seat) (see page ir-33)
- Remove deck trim side panel assembly rh (w/ rear no. 2 Seat) (see page ir-34)
- Remove inner roof side garnish assembly rh (see page ir-35)
- Remove tire pressure warning antenna and receiver
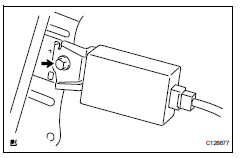
- Disconnect the connector.
- Remove the bolt and receiver.
 Tc and cg terminal circuit
Description
Dtc output mode is set by connecting terminals 13 (tc) and 4 (cg) of the
dlc3. The dtcs are indicated
by the blinking of the tire pressure warning light.
Wiring diagram
Hint:
Wh ...
 Installation
Install tire pressure warning antenna and receiver
Install the receiver with the bolt.
Torque: 7.5 N*m (76 kgf*cm, 66 in.*Lbf)
Connect the connector.
Install inner roof side g ...
Other materials:
Precaution
Handling precaution
When handling the electronic parts:
Avoid any impact to electronic parts such as
ecus and relays. Replace with new ones if
dropped or subjected to a severe blow.
Do not expose any electronic parts to high
temperatures and humidity.
Do not touch the connec ...
Installation (2006/01- )
Install front drive shaft assembly lh
Coat the spline of the inboard joint shaft with gear
oil.
Align the shaft splines and tap in the drive shaft with
a brass bar and hammer.
Notice:
Set the snap ring with the opening side facing
downwards.
Be careful not to damage the ...
Terminals of ecu
Check sliding roof drive gear subassembly (sliding roof ecu)
Disconnect the p6 ecu connector.
Measure the resistance and voltage of the wire
harness side connector.
Reconnect the p6 ecu connector.
Measure the voltage of the connector.
If the result is not as speci ...
