Toyota RAV4 (XA40) 2013-2018 Service Manual: Reassembly
Caution:
Wear protective gloves. Sharp areas on the seat frame (with adjuster) may injure your hands.
Hint:
- Use the same procedures for the rh side and lh side.
- The procedures listed below are for the lh side.
- Install occupant classification ecu (for driver side) (see page rs-394)
- Install seat position airbag sensor (for driver side) (see page rs-390)
- Install front seat cushion lower shield lh

- Attach the claw to install the lower shield.
- Install front seat cushion lower shield rh
Hint:
Use the same procedures described for the lh side.
- Install reclining adjuster upper inside cover lh
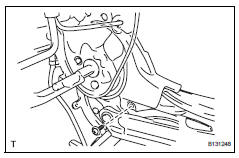
- Install the inside cover with the screw.
- Install reclining adjuster upper inside cover rh
- Install the inside cover with the screw.
- Install reclining adjuster lower inside cover lh
- Attach the claw to install the inside cover.
- Install the screw.
- Install reclining adjuster lower inside cover rh
Hint:
Use the same procedures described for the lh side.
- Install front seatback heater (w/ seat heater system)
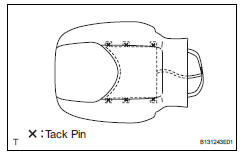
- Using a tacker, install the seatback heater to the end of the seat cover with 6 new tack pins.
Notice:
Do not substitute other metal parts for tack pins.
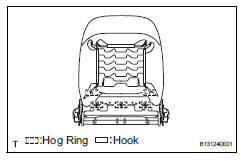
- Install front seatback cover
Notice:
- Be careful not to damage the cover.
- When installing the hog rings, avoid wrinkling the cover.
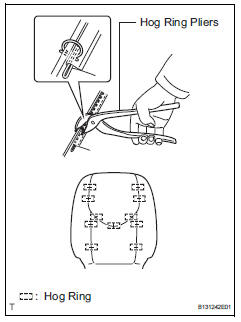
- Using hog ring pliers, install the seatback cover to the seatback pad with 11 new hog rings.
- Install the seatback cover (with pad) to the seat frame (with adjuster).
- W/ front seat side airbag: fully cover the airbag with the 2 seatback cover brackets and install the nut.
Torque: 5.5 N*m (56 kgf*cm, 49 in.*Lbf)
Caution:
- For vehicles with side airbags, the seatback cover must be securely installed. Otherwise, the side airbags may not deploy properly.
- Make sure that the strap is not twisted after installing the bracket.
- Install the bracket securely.
- Attach the 4 claws to install the 2 headrest supports.
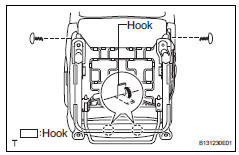
- W/ seatback board: attach the hooks.
- W/ seatback board: using hog ring pliers, install 5 new hog rings.
- W/o seatback board: using hog ring pliers, install 3 new hog rings.
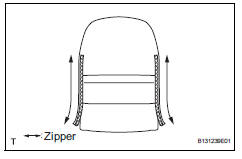
- W/o seatback board: close the 2 zippers.
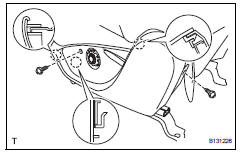
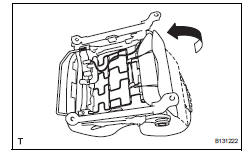
- Install front seatback board subassembly lh (w/ seatback board)
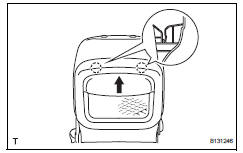
- Push the seatback board in the direction indicated by the arrow in the illustration to attach the 2 claws.
- Open the lower part of the seatback board. Then install the seatback board with the 2 screws.
- Install front seat cushion heater (w/ seat heater system)
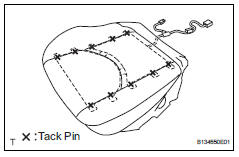
- Using a tacker, install the seat cushion heater to the end of the seat cover with 10 new tack pins.
Notice:
Do not substitute other metal parts for tack pins.
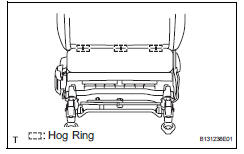
- Install front seat cushion cover
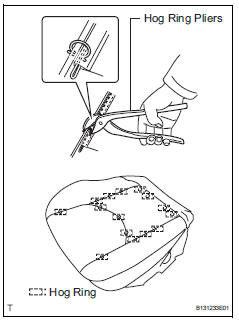
- Using hog ring pliers, install the seat cushion cover to the seat cushion pad with 15 new hog rings.
Notice:
- Be careful not to damage the cover.
- When installing the hog rings, avoid wrinkling the cover.
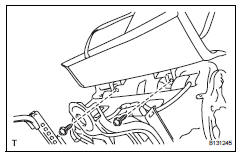
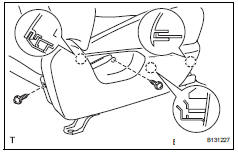
- Install the seat cushion cover (with pad) to the seat frame (with adjuster).
- Attach the hooks and install the 2 clips.
- W/ seat heater system: connect the connector.
- Install front seat inner belt assembly (see page sb-23)
- Install front seat cushion inner shield lh

- Attach the clip and claw to install the inner shield.
- Install the screw.
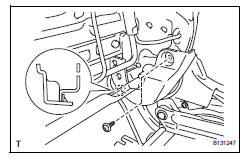
- Install front seat cushion shield lh (for driver side)
- Attach the 3 claws to install the cushion shield.
- Install the 2 screws.

- Connect the 2 rubber bands of the front seatback board or front seatback cover to the seat frame (with adjuster).
- Install front seat cushion shield rh (for front passenger side)
- Attach the 3 claws to install the cushion shield.
- Install the 2 screws.
- Connect the 2 rubber bands of the front seatback board or front seatback cover to the seat frame (with adjuster).
- Install reclining adjuster release handle lh (for driver side)
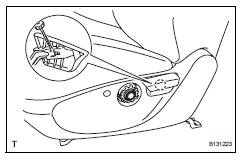
- Attach the claw to install the release handle.
- Install reclining adjuster release handle Rh (for front passenger side)
Hint:
Use the same procedures described for the driver side.
- Install vertical adjusting handle (for driver side)
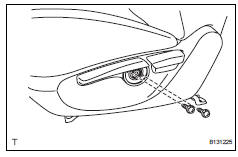
- Install the handle with the 2 screws.
- Install vertical adjuster cover lh (for driver side)
- Attach the 2 claws to install the cover.
 Disassembly
Caution:
Wear protective gloves. Sharp areas on the seat frame
(with adjuster) may injure your hands.
Hint:
Use the same procedures for the rh side and lh side.
The procedures listed below ar ...
 Front seat assembly (for power seat type lh side)
Components
...
Other materials:
Horn relay
On-vehicle inspection
Remove engine room no. 1 Relay block cover
Inspect integration relay (unit a: horn relay)
Using a screwdriver, detach the 2 claws and
disconnect the integration relay from the engine
room junction block.
Hint:
Tape the screwdriver tip before use.
Mea ...
Parking brake cable
Components
Removal
Remove rear console box sub-assembly
Remove the rear console box (see page ip-16).
Hint:
Refer to the procedures from the removal of the no.
1 Console upper panel garnish up until the removal
of the rear console box sub-assembly.
Loosen lock nut and no. ...
Fail-safe chart
If a problem occurs in the electric power steering system, the
p/s warning light will come on in the combination meter and
steering power assist will be stopped, fixed at a particular
point, or decreased simultaneously to protect the system.
Hint:
The amount of power assist may be decreased ...
