Toyota RAV4 (XA40) 2013-2018 Service Manual: Rear wiper motor
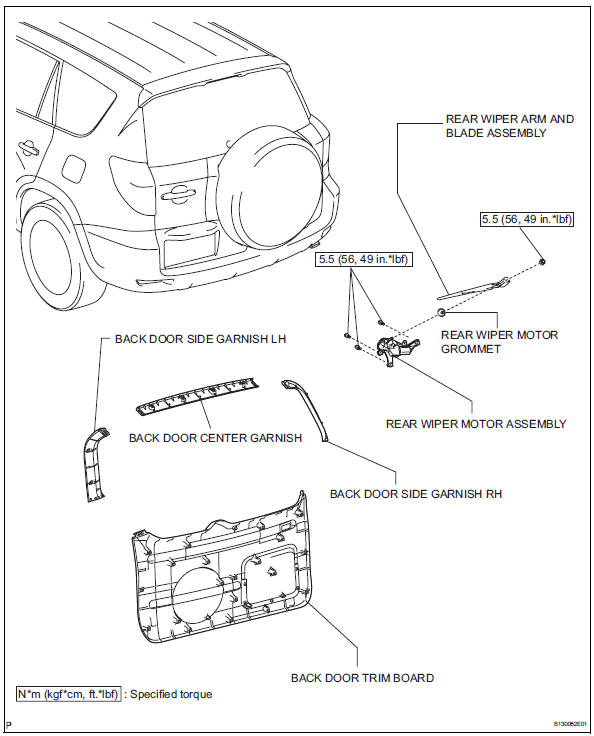
Components
Removal
- Disconnect cable from negative battery terminal
Caution:
Wait at least 90 seconds after disconnecting the cable from the negative (-) battery terminal to prevent airbag and seat belt pretensioner activation.
- Remove back door center garnish (see page ed-59)
- Remove back door side garnish lh (see page ed-59)
- Remove back door side garnish rh (see page ed-59)
- Remove back door trim board (see page ed- 59)
- Remove rear wiper arm and blade assembly
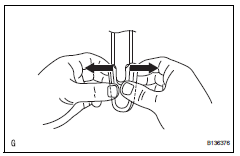
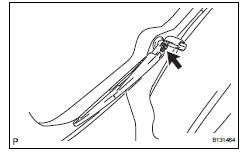
- Widen each end of the cap 5 mm (0.19In).
- Lift the both widened ends of the cap.
- Rotate the cap. Fix the cap in place.
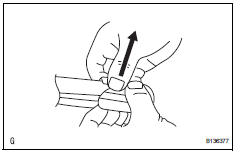
- Remove the nut and arm and blade.
- Remove rear wiper motor grommet
- Remove rear wiper motor assembly

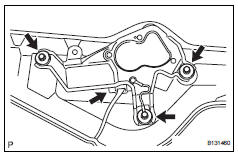
- Disconnect the connector.
- Remove the 3 bolts and wiper motor.
Inspection
- Inspect rear wiper motor
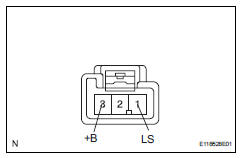
- Connect the battery's positive (+) lead to terminal 3 (+b) and the negative (-) lead to terminal 1 (ls).
- Check that the rear wiper motor operates.
Ok: rear wiper motor operates.
Notice:
Check that the body ground is connected.
If the result is not as specified, replace the motor.
Installation
- Install rear wiper motor assembly
- Install the wiper motor with the 3 bolts.
Torque: 5.5 N*m (56 kgf*cm, 49 in.*Lbf)
- Connect the connector.
- Install rear wiper motor grommet
- Install rear wiper arm and blade assembly
- Stop the wiper motor at the automatic stop position.
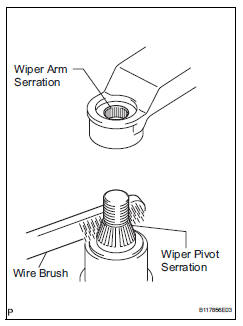
- Clean the wiper arm serration with a round file or equivalent.
- Clean the wiper pivot serration with a wire brush.

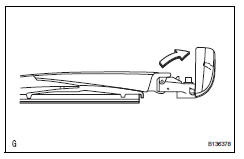
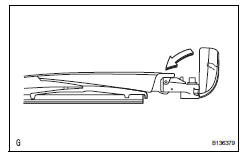
- Install the arm and blade with the nut. Make sure that the arm and blade comes to the position shown in the illustration.
Torque: 5.5 N*m (56 kgf*cm, 49 in.*Lbf)
Hint:
- Hold down the arm hinge by hand while tightening the nut.
- Install the arm and blade so that the rear wiper blade is aligned with the ceramic line.
- Install the cap.
- Install back door trim board assembly (see page ed-66)
- Install back door side garnish rh (see page ed-67)
- Install back door side garnish lh (see page ed-67)
- Install back door center garnish (see page ed-67)
- Connect cable to negative battery terminal
 Front wiper rubber
Components
Removal
Remove front wiper blade
Detach the claw as shown in the illustration.
Remove the wiper blade as shown in the illustration.
Notice:
Do not fold ...
 Rear wiper rubber
Components
Removal
Remove rear wiper blade assembly
Rotate and remove the cap as described in the
"remove" procedures.
Raise the arm and blade.
Raise the wip ...
Other materials:
How to proceed with troubleshooting (2005/11-2006/01)
Hint:
Use these procedures to troubleshoot the air conditioning
system.
*: Use the intelligent tester.
Vehicle brought to workshop
Customer problem analysis and symptom check
Inspect battery voltage
Standard voltage:
11 to 14 v
If the voltage is below 11 v, rechar ...
Disassembly
Caution:
Wear protective gloves. Sharp areas on the seat frame
(with adjuster) may injure your hands.
Hint:
Use the same procedures for the rh side and lh side.
The procedures listed below are for the lh side.
Remove vertical adjuster cover lh (for driver side)
Using a screw ...
Customizing the startup and screen off images (if equipped)
An image can be copied from a usb memory and used as the startup
and screen off images.
When the engine switch is in the “acc” or “on” position (vehicles
without a smart key system) or accessory or ignition on mode
(vehicles with a smart key system), the initial screen will be displaye ...
