Toyota RAV4 (XA40) 2013-2018 Service Manual: Installation
Hint:
- Use the same procedures for the rh side and lh side.
- The procedures listed below are for the lh side.
- When installing the moulding, heat the vehicle body and moulding using a heat light.
Standard heating temperature 
Notice:
Do not heat the vehicle body and moulding excessively.
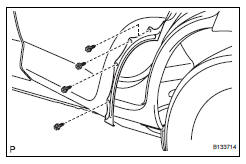
- Install no. 1 Rocker panel moulding retainer lh
- Install the 2 retainers with the 4 screws.
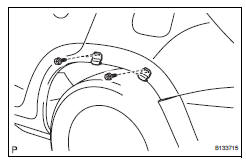
- Install quarter opening retainer lh
- Install the retainer with the 4 screws.
- Install no. 2 Rocker panel moulding retainer lh
- Install the retainer with the 2 screws.
- Install rear quarter outside moulding lh
- Attach the 5 clips to install the moulding.
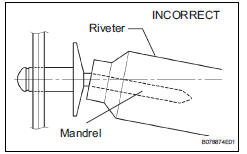
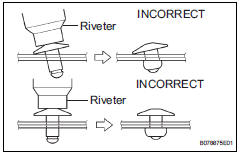
- Using an air riveter or hand riveter with a nose piece, strike 2 rivets to the vehicle to install the rear quarter outside moulding to the vehicle.
Notice:
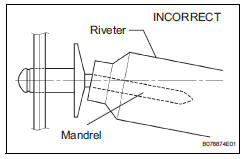
If the rivet is not positioned perpendicularly, it will bend the mandrel.
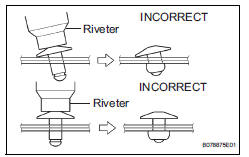
- Do not pry the rivet with the riveter, as this will cause damage to the riveter and mandrel.
- Confirm that the rivets are seated properly against the moulding. Do not tilt the riveter when installing the rivet to the moulding. Do not leave any space between the rivet head and moulding.
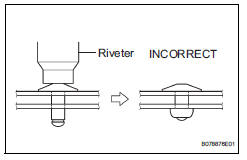
- Do not leave any space between the moulding and door panel. Firmly hold together the 2 items while installing the rivet.
- Install no. 1 Rear wheel opening extension lh
- Attach the 5 clips to install the extension.
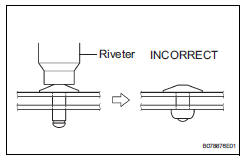
Using an air riveter or hand riveter with a nose piece, strike 2 rivets to the vehicle to install the rear wheel opening extension to the vehicle.
Notice:
If the rivet is not positioned perpendicularly, it will bend the mandrel.
- Do not pry the rivet with the riveter, as this will cause damage to the riveter and mandrel.
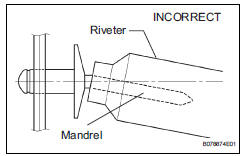
- Confirm that the rivets are seated properly against the moulding. Do not tilt the riveter when installing the rivet to the moulding. Do not leave any space between the rivet head and moulding.
- Do not leave any space between the moulding and door panel. Firmly hold together the 2 items while installing the rivet.
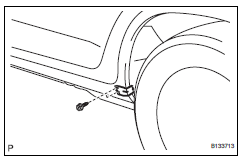
- Install no. 2 Rear wheel opening extension lh
- Attach the clip to install the extension.
Install the screw and clip.
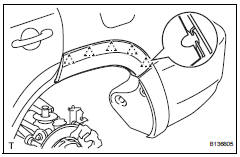
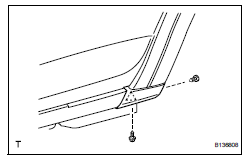
- Install front fender moulding subassembly lh
- Attach the 9 clips to install the extension
- Install the 4 screws and 2 clips.
 Removal
Hint:
Use the same procedures for the rh side and lh side.
The procedures listed below are for the lh side.
When removing the moulding, heat the vehicle body and
moulding using a heat light. ...
 Back door outside garnish
Components
Removal
Disconnect cable from negative battery
terminal
Caution:
Wait at least 90 seconds after disconnecting the
cable from the negative (-) battery terminal to
preven ...
Other materials:
Disassembly (2005/11-2006/01)
Remove front axle inboard joint boot no. 2 Clamp lh
One touch type:
Using a screwdriver, remove the inboard joint
boot clamp, as shown in the illustration.
Claw engagement type:
Using needle-nose pliers, remove the inboard
joint boot clamp, as shown in the illustra ...
Removal
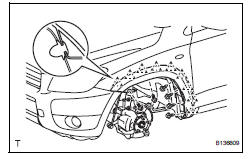
Remove radiator grille sub-assembly
Remove the 4 bolts and 4 nuts.
Detach the 6 claws and remove the radiator grille.
Remove no. 1 Radiator grille lower
Detach the 16 claws and remove the radiator grille.
Remove no. 2 Radiator grille lower
Detac ...
Door courtesy switch circuit
Description
The main body ecu detects the condition of the door courtesy switch.
Wiring diagram
Inspection procedure
Read value of intelligent tester (door courtesy light switch)
Connect the intelligent tester (with can vim) to the
dlc3.
Turn the ignition switch to the on positi ...
